The Factory Method Design Pattern הוא כמו מפעל של אובייקטים. ה-pattern מספק לנו interface שממנו אנחנו מייצרים אובייקטים כ-superclass ומאפשרים להן לשנות את הסוג שלהן בזמן יצירה.
מה זה Factory Method?
נניח שיש אפליקציה שמנהלת מרכז לוגיסטיקה. בהתחלה עבדנו עם משאיות, ולכן כל הקוד שלנו נמצא בתוך אובייקט Truck. אחרי כמה זמן, חברת הפצה ימית רואה שיש לנו אפליקציה מעולה והיא רוצה להשתמש בה גם במערך הלוגיסטיקה שלה.
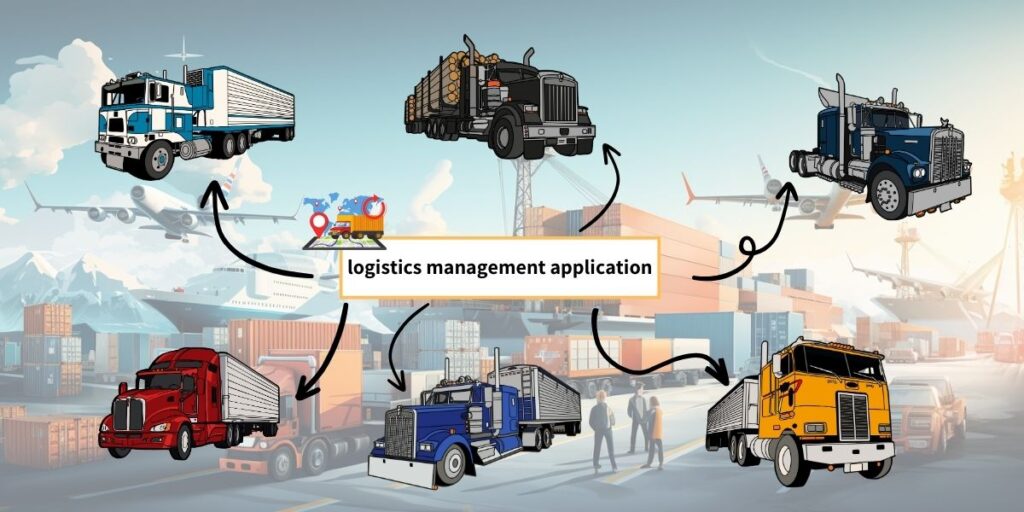
מה הבעיה? הקוד שלנו מתאים למשאית, וכדי להוסיף אוניות נצטרך ללכת לכל מקום שכתוב בו משאית ולהוסיף את אפשרות האוניה. זה משהו שמאוד קשה לעשות בלי שיהיו המון בעיות. ואם חברת הפצה על אופנועים תרצה להשתמש גם באפליקציה, שוב נצטרך לעשות את כל העבודה.
קבלנו קוד עצום, בלאגן והמון תנאים לבדיקה כדי שהאפליקציה תתאים לכל אפשרויות התחבורה האלה.
הפתרון: The Factory Method pattern.
The Factory Method pattern מציע שבמקום ליצור את אובייקט ה-truck ישירות, נחליף את היצירה שלו בקריאה ל-factory שיצור אותו. כל האובייקטים שה-factory מייצר הם subclasses של אותו interface ויש להם פעולות משותפות.
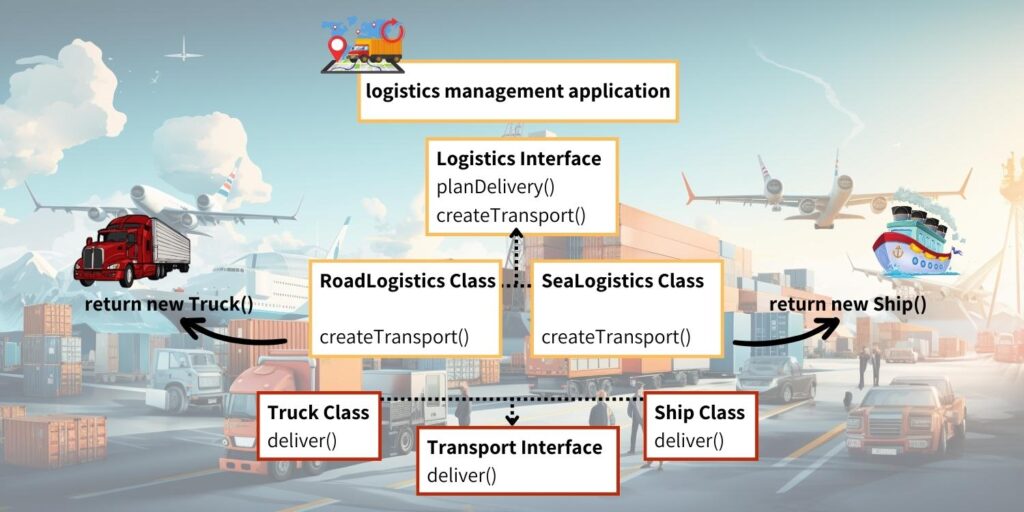
המימוש של הפונקציה deliver, למשל, יהיה שונה לכל סוג אמצעי תחבורה, אבל מבחינת האפליקציה זה לא משנה לה איך מממשים את הפונקציה.
דוגמא פשוטה – תפקידים בחנות אינטרנטית
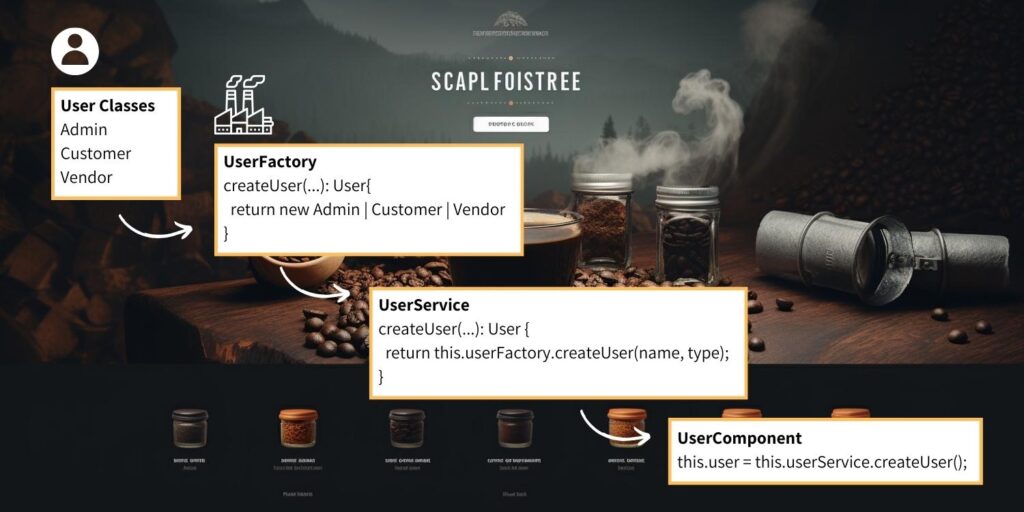
נניח שאנחנו מפתחים חנות אינטרנטית שיש בה 3 סוגי משתמשים. מנהל, לקוח ומוכר. לכל משתמש יש פונקציונליות שונה באתר.
אתגרים:
- יצירת מופעי משתמש בלי ליצור כפילויות בקוד.
- יכולת להוסיף סוגי משתמשים בלי צורך לעבור על כל הקוד הקיים ולבצע שינויים.
פתרון על ידי Factory Method:
The Factory Method Design Pattern יכול להציע פתרון על ידי ריכוז תהליך יצירת המשתמשים. התהליך יתבצע כך שכל יצירה של משתמש תוכל להרחיב את הקוד הקיים, אבל לא לשנות אותו.
דוגמא לקוד אנגולרי.
Defining User Classes
export abstract class User {
    constructor(public name: string, public userType: string) {}
}

export class Admin extends User {
    constructor(name: string) {
        super(name, 'Admin');
    }
}

export class Customer extends User {
    constructor(name: string) {
        super(name, 'Customer');
    }
}

export class Vendor extends User {
    constructor(name: string) {
        super(name, 'Vendor');
    }
}
User Factory
export class UserFactory {
    createUser(name: string, type: string): User {
        switch(type) {
            case 'Admin':
                return new Admin(name);
            case 'Customer':
                return new Customer(name);
            case 'Vendor':
                return new Vendor(name);
            default:
                throw new Error('User type is not recognized!');
        }
    }
}
Angular Service
import { Injectable } from '@angular/core';
import { User, Admin, Customer, Vendor, UserFactory } from './user.model';

@Injectable({
    providedIn: 'root'
})
export class UserService {
    private userFactory = new UserFactory();

    createUser(name: string, type: string): User {
        return this.userFactory.createUser(name, type);
    }
}
Component Usage
import { Component, OnInit } from '@angular/core';
import { User } from './user.model';
import { UserService } from './user.service';

@Component({
    selector: 'app-user',
    template: `<h1>Welcome {{ user.name }}! You are logged in as a(n) {{ user.userType }}.</h1>`
})
export class UserComponent implements OnInit {
    user: User;

    constructor(private userService: UserService) {}

    ngOnInit(): void {
        // Example: Create a user of type 'Admin'
        this.user = this.userService.createUser('Alice', 'Admin');
    }
}
יתרונות:
אחריות בודדת – יצירת המשתמש מתבצעת בנפרד משאר הקוד, קל יותר לטפל בו ולעשות שינויים.
קוד סגור – אפשר להמשיך ולהוסיף סוגי משתמשים בלי להשפיע על השימוש בקומפוננטה.
גדילה – פישוט תהליך יצירת המשתמש מאפשר לשנות לפי הצורך את השימוש בתהליך.
דוגמא – אמצעי תשלום
נניח שיש לנו אתר מכירות אינטרנטי גדול, שבו הלקוחות יכולים לשלם במגוון דרכים, למשל כרטיס אשראי, PayPal ואפשרויות נוספות.
אנחנו רוצים לפתח באפליקציה קוד שבו לכל אפשרות תשלום יהיה API משלו לתקשר איתו. אנחנו רוצים לאפשר הוספת אמצעי תשלום נוספים בהמשך, בלי לשנות את הקוד בכל האפליקציה, ולכן צריך להמנע מיצירת תלות של תהליך התשלום באמצעי תשלום כלשהו.
פתרונות אפשריים
Switch-Case throughout the code – אפשר בכל מקום שבו יש שימוש באמצעי תשלום לבדוק מה סוג התשלום שהגיע. קשה מאוד לנהל את הקוד בצורה הזאת וגם לא חכם ולא מנצל את יכולות האובייקטים.
Separate Modules for Each Gateway – אפשר ליצור מודול עבור כל צורת תשלום, אבל אז תהיה חזרה על הקוד ובכל מקרה שינוי של משהו באמצעי התשום ידרוש שינוי עומק בקוד.
Factory Method Design Pattern – ריכוז יצירת התשלום, ולא משנה באיזה שטיה הוא מתבצע, בלי הצמדה של קוד הטיפול בתשלום לשום צורת תשלום ספציפית.
דוגמא באנגולר.
Defining Payment Gateways
export interface PaymentGateway {
    processPayment(amount: number): string;
}

export class CreditCardGateway implements PaymentGateway {
    processPayment(amount: number): string {
        return `Processing credit card payment of $${amount}.`;
    }
}

export class PayPalGateway implements PaymentGateway {
    processPayment(amount: number): string {
        return `Processing PayPal payment of $${amount}.`;
    }
}

export class AliPayGateway implements PaymentGateway {
    processPayment(amount: number): string {
        return `Processing AliPay payment of ¥${amount}.`;
    }
}
Payment Gateway Factory
export class PaymentGatewayFactory {
    createGateway(type: string): PaymentGateway {
        switch(type) {
            case 'CreditCard':
                return new CreditCardGateway();
            case 'PayPal':
                return new PayPalGateway();
            case 'AliPay':
                return new AliPayGateway();
            default:
                throw new Error('Payment gateway type is not recognized!');
        }
    }
}
Angular Service
import { Injectable } from '@angular/core';
import { PaymentGateway, CreditCardGateway, PayPalGateway,
    AliPayGateway, PaymentGatewayFactory } from './payment-gateway.model';

@Injectable({
    providedIn: 'root'
})
export class PaymentService {
    private gatewayFactory = new PaymentGatewayFactory();

    processPayment(type: string, amount: number): string {
        const gateway = this.gatewayFactory.createGateway(type);
        return gateway.processPayment(amount);
    }
}
Component Usage
import { Component } from '@angular/core';
import { PaymentService } from './payment.service';

@Component({
    selector: 'app-payment',
    template: `<h1>{{ paymentConfirmation }}</h1>`
})
export class PaymentComponent {
    paymentConfirmation: string;

    constructor(private paymentService: PaymentService) {
        this.paymentConfirmation = this.processPayment('AliPay', 100);
    }

    processPayment(type: string, amount: number): string {
        return this.paymentService.processPayment(type, amount);
    }
}
שימוש נוסף ב-Factory Method
דוגמאות נוספות שבהן אפשר להשתמש ב-Factory Method:
- CRM System – מערכת ניהול לקוחות. צריך ליצור סוגים שונים של לקוחות ולכל לקוח תהיה פונקציונליות שמיוחדת לו.
- Document Management System – מערכת ניהול מסמכים. המשתמש יכול ליצור סוגים שונים של מסמכים.
- HR Software – מערכת גיוס עובדים. לתפקידים שונים של מועמדים אפשר להצמיד פרופיל אחר ודרישות אחרות.
- Content Management Systems (CMS) – מערכת ניהול תוכן. יצירת סוגים שונים של תוכן.
- Database Management Tools – ניהול מסדי נתונים. על סמך ה-DB שמולו עובדים אפשר ליצור connection מותאם עם ניהול מתאים.
בכל אחת מהדוגמאות האלה אפשר להשתמש ב-Factory Method כך שהלוגיקה מרוכזת, כל אובייקט מטפל בעצמו ואין תלות של הקוד באובייקט מסויים.
