פרוייקט לדוגמא ב-react native. הערות שיהיו יעילות לכתיבת אפליקציות בעתיד.
פתיחת פרוייקט חדש
npx create-expo-app@latest
איתחול הפרוייקט
npm run reset-project
הרצת הפרוייקט
npx expo start
Tab Navigation
הדבר הראשון שנעשה הוא להציב את המסכים לניווט עם הסרגל התחתון. נעשה את זה עם expo router.
נבטל את קובץ index וניצור תיקיית (tabs) בתוך תיקיית app. נוסיף את הקבצים הבאים: index.jsx, Profile.jsx, AddNew.jsx ואת layout.jsx_.
הקלדה של האותיות rnf ואישור תתן מבנה בסיסי של עמוד.
layout.jsx_
import React from 'react'
import { Tabs } from 'expo-router'

export default function TabLayout() {
  return (
    <Tabs>
        <Tabs.Screen name='index'/>
        <Tabs.Screen name='AddNew'/>
        <Tabs.Screen name='Profile'/>
    </Tabs>
  )
}
נשנה את תוכן קובץ layout.jsx_ שנמצא מחוץ לתיקיית app כך שינווט דרך ה-tabs שלנו.
import { Stack } from "expo-router";

export default function RootLayout() {
  return (
    <Stack screenOptions={{
      headerShown: false
    }}>
      <Stack.Screen name="(tabs)" />
    </Stack>
  )
}
אם נציג עכשיו את המסך נראה את הטקסט שיש לנו במסך הבית ולחיצה על כל tab תראה את התוכן שלו.
כדי להוריד את כותרת העמוד שכתוב בה tabs השתמשנו ב-headerShown. אפשר לעשות את זה גם בקומפוננטת ה-tabs.
אחרי שהטאבים עובדים נעדכן את הטקסט והאיקונים שלהם. איקונים אפשר למצוא בספריית האייקונים של expo.
layout.jsx_ (פנימי)
import FontAwesome from '@expo/vector-icons/FontAwesome';
import React from 'react'
import { Tabs } from 'expo-router'

export default function TabLayout() {
  return (
    <Tabs
        screenOptions={{
            headerShown: false
        }}
    >
        <Tabs.Screen name='index'
            options={{
                tabBarLabel:"Home",
                tabBarIcon:({color, size}) => (
                    <FontAwesome name="home" size={size} color={color} />
                )
            }}
        />
        <Tabs.Screen name='AddNew'
            options={{
                tabBarLabel:"Add New",
                tabBarIcon:({color, size}) => (
                    <FontAwesome name="plus-square" size={size} color={color} />
                )
            }}
        />
        <Tabs.Screen name='Profile'
            options={{
                tabBarLabel:"Profile",
                tabBarIcon:({color, size}) => (
                    <FontAwesome name="user" size={size} color={color} />
                )
            }}
        />
    </Tabs>
  )
}
Welcome Screen UI
בכניסה לאפליקציה, אם המשתמש לא מזוהה, הוא יעבור למסך login, אם הוא מזוהה הוא יגיע למסך הבית.
ניצור תיקיית login ובתוכה קובץ index.jsx עם מבנה בסיסי של קומפוננטה. בקובץ layout.jsx_ החיצוני ניצור Stack.Screen חדש עם השם login.
כדי להגיע לעמוד הזה, נוסיף <Redirect href={'login'} /> לעמוד הבית.
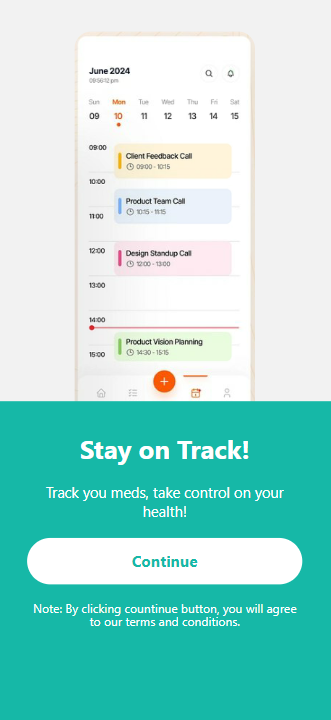
בעמוד הבית נציג צילום מסך של האפליקציה.
כדי להשתמש באותם הצבעים בכל האפליקציה ניצור תיקיית constants בתיקייה הראשית ובתוכה קובץ Colors.jsx.
export default{
    PRIMARY: '#16B8A7'
}
הקוד המלא של קובץ index.jsx בתיקיית login:
import { View, Image, StyleSheet, Text, Button,
     TouchableOpacity } from 'react-native'
import React from 'react'
import Colors from '../../constants/Colors'

export default function LoginScreen() {
  return (
    <View>
        <View style={styles.imageContainer}>
            <Image source={require('./../../assets/images/screenshot.png')}
                style={styles.image}
            />
        </View>

        <View style={styles.contentContainer}>
            <Text style={styles.headline}>Stay on Track!</Text>
            <Text style={styles.tagline}>Track you meds, take control on your health!</Text>

            <TouchableOpacity style={styles.buttonContainer}>
                <Text style={styles.button}>Continue</Text>
            </TouchableOpacity>
            <Text style={styles.terms}>Note: By clicking countinue
                  button, you will agree to our terms and conditions.</Text>
        </View>
    </View>
  )
}

const styles = StyleSheet.create({
    imageContainer: {
        display: 'flex',
        alignItems: 'center',
        marginTop: 40
    },

    image: {
        width: 210,
        height: 450,
        borderRadius: 20
    },

    contentContainer: {
        padding: 35,
        backgroundColor: Colors.PRIMARY,
        height: '100%',
        marginTop: -20,
        // borderTopStartRadius: 20,
        // borderTopEndRadius: 20
    },

    headline: {
        fontSize: 30,
        fontWeight: 'bold',
        color: '#fff',
        textAlign: 'center'
    },

    tagline: {
        color: '#fff',
        textAlign: 'center',
        fontSize: 17,
        marginTop: 20
    },

    buttonContainer: {
        padding: 15,
        backgroundColor: '#fff',
        borderRadius: 99,
        marginTop: 20
    },

    button: {
        textAlign: 'center',
        fontSize: 18,
        fontWeight: 'bold',
        color: Colors.PRIMARY
    },

    terms: {
        marginTop: 20,
        lineHeight: 15,
        color: '#fff',
        textAlign: 'center'
    }
})
וככה נראה המסך, כרגע עם סתם תמונה כי עוד אין לי את התמונה של האפליקציה…
Sign In Screen UI
המסך הבא הוא מסך ההרשמה. ניצור בשבילו קובץ בשם signin.jsx בתוך תיקיית login.
כדי לעבור למסך הבא נוסיף למסך LoginScreen את const router = useRouter(); ולרכיב TouchableOpacity נוסיף את פונקציית onPress.
export default function LoginScreen() {
  const router = useRouter();
  ...
  <TouchableOpacity style={styles.buttonContainer}
    onPress={() => router.push('login/signin')}
  >
קובץ sign in עם טופס הרשמה:
import { SafeAreaView, View, StyleSheet, Text,
    TextInput, TouchableOpacity
 } from 'react-native'
import { useRouter } from 'expo-router'
import Colors from '../../constants/Colors'
import React from 'react'

export default function SignIn() {
    const router = useRouter();

  return (
    <View style={styles.mainContainer}>
        <View>
            <Text style={styles.header}>Sign In</Text>
            <Text style={styles.subheader}>Wecome Back</Text>
        </View>

        <View style={styles.formContainer}>
            <Text>Email:</Text>
            <TextInput style={styles.textInput}
                placeholder="Email"
            />

            <Text>Password:</Text>
            <TextInput style={styles.textInput}
                placeholder="Password"
                secureTextEntry={true}
            />

            <TouchableOpacity style={styles.buttonContainer}
                onPress={() => router.push('#')}
            >
                <Text style={styles.button}>Login</Text>
            </TouchableOpacity>

            <TouchableOpacity style={styles.linkContainer}
                onPress={() => router.push('#')}
            >
                <Text style={styles.link}>Create Account</Text>
            </TouchableOpacity>
        </View>

    </View>
  )
}

const styles = StyleSheet.create({
    mainContainer: {
        padding: 25
    },

    header: {
        fontSize: 25,
        fontWeight: 'bold',
        marginTop: 15
    },

    subheader:{
        fontSize: 18,
        marginTop: 10,
        color: "#b0b0b0"
    },

    formContainer: {
        marginTop: 25
    },

    textInput: {
        padding: 10,
        borderWidth: 1,
        fontSize: 16,
        borderRadius: 10,
        borderColor: "#c0c0c0",
        marginTop: 5,
        backgroundColor: '#fff',
        marginBottom: 15
    },

    buttonContainer: {
        padding: 10,
        backgroundColor: Colors.PRIMARY,
        borderRadius: 10,
        marginTop: 10
    },

    button: {
        textAlign: 'center',
        fontSize: 18,
        color: '#fff'
    },

    linkContainer: {
        marginTop: 20
    },

    link: {
        textAlign: "center",
        textDecorationLine: "underline"
    }
})
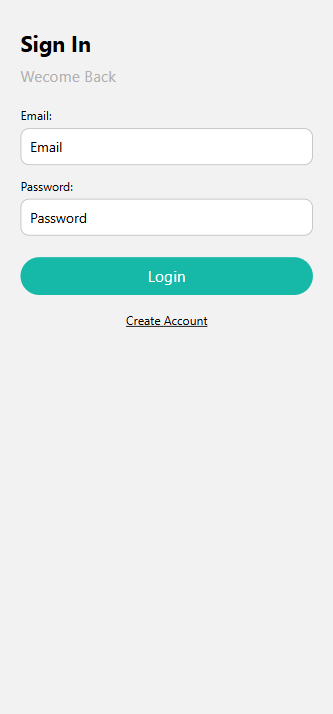
Sign Un Screen UI
ניצור את עמוד ההרשמה signup.jsx. ננווט את קישור ההרשמה לעמוד המתאים. העמוד נראה כמעט כמו עמוד ה-Sign In. יש בו מקום להכניס שם והטקסטים שונו בהתאם.

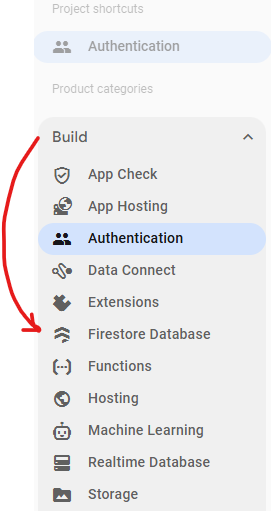
Authentication
לבסיס הנתונים נשתמש ב-Firebase. יש להם תוכנית חינמית וקל לבדוק שם את האפליקציה.
אחרי הרשמה נלחץ Go to console נבחר create a project. ניתן שם לפרוייקט ונמשיך את תהליך ההתקנה עד לסיום.
נבחר ליצור אפליקציית web.
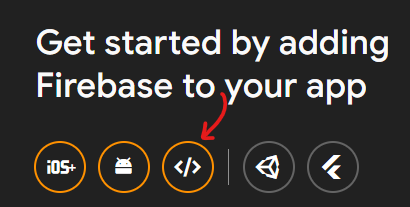
אחרי הרשמת האפליקציה נקבל קטע קוד.
נשתמש ב:
npm install firebase
להתקין את firebase בפרוייקט.
בתיקיית הבסיס ניצור תיקיית config ובתוכה קובץ FirebaseConfig.jsx. לתוך הקובץ נעתיק את הקוד שנתנו לנו בעמוד.
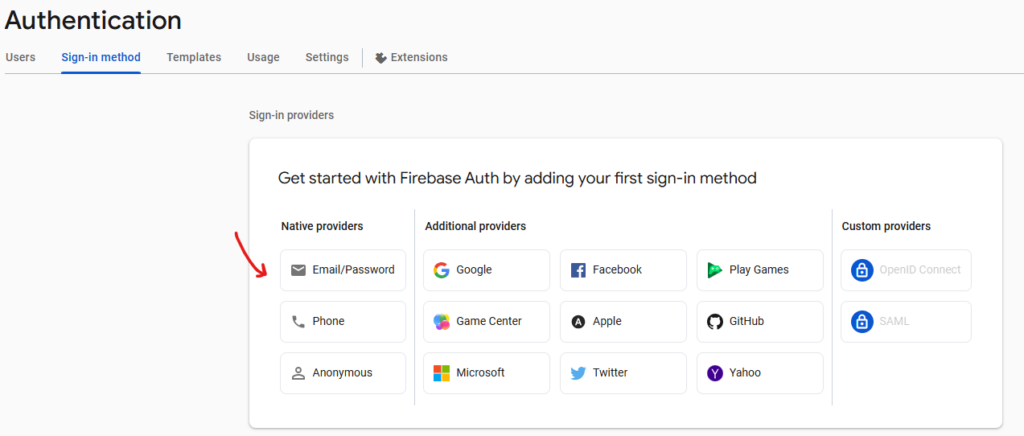
נחזור ל-console ונבחר את שירות authentication. המסך משתנה כל הזמן וכדאי לראות את ההדרכה העדכנית שהם נותנים בעמוד.
נלחץ על Get started כדי להתחיל בתהליך. בתור דרך הרשמה נבחר Email/Password מהאפשרויות שבעמוד.
בסוף קובץ FirebaseConfig נוסיף:
export const auth=getAuth(app)
ובראש הקובץ את ה-import:
import { getAuth } from "firebase/auth"
אפשר לקרוא את התיעוד של תהליך ההרשמה של משתמש.
לקובץ signup נוסיף את הקוד להרשמת משתמש על פי התיעוד של firebase.
...
import { createUserWithEmailAndPassword } from "firebase/auth";
import { auth } from '../../config/FirebaseConfig'

export default function SignUp() {
  const router = useRouter();
  const [email, setEmail] = useState();
  const [password, setPassword] = useState();
  const [userName, setUserName] = useState();

  const onCreateAccount = () => {
    if(!email || !password || !userName){
        notifyMessage('Please fill all details');
        return;
    }

    createUserWithEmailAndPassword(auth, email, password)
        .then(async(userCredential) => {
            // Signed up
            const user = userCredential.user;
            await updateProfile(user, {
                displayName: userName
            })
            router.push('(tabs)');
            // ...
        })
        .catch((error) => {
            const errorCode = error.code;
            const errorMessage = error.message;
            console.log(errorCode);
            if(errorCode == 'auth/email-alreay-in-use'){
                notifyMessage('Email already exist.');
            }
        });
  }

  function notifyMessage(msg) {
    console.log(msg);
    if (Platform.OS === 'android') {
        ToastAndroid.show(msg, ToastAndroid.SHORT, ToastAndroid.BOTTOM)
    } else {
        Alert.alert(msg);
    }
  }

  return (
  ...
  )
  ...
}
את הערכים של המייל והסיסמא נקבל משדות ה-input.
<Text>Email:</Text>
<TextInput style={styles.textInput}
    placeholder="Email"
    onChangeText={(value) => setEmail(value)}
/>

<Text>Password:</Text>
<TextInput style={styles.textInput}
    placeholder="Password"
    secureTextEntry={true}
    onChangeText={(value) => setPassword(value)}
/>

<TouchableOpacity style={styles.buttonContainer}
    onPress={onCreateAccount}
>
    <Text style={styles.button}>Create Account</Text>
</TouchableOpacity>
בהכנסת פרטי המשתמש להרשמה, נוצר משתמש חדש בטבלת המשתמשים.
נעבור לעמוד ה-signin.
import { notifyMessage } from '../../Utils/Utils'

export default function SignIn() {
  const router = useRouter();
  const [email, setEmail] = useState();
  const [password, setPassword] = useState();

  const onSignIn = () => {
    if(!email || !password){
        notifyMessage('Please fill all details');
        return;
    }

    signInWithEmailAndPassword(auth, email, password)
        .then((userCredential) => {
            // Signed in
            const user = userCredential.user;
            console.log(user);
            router.push('(tabs)');
        })
        .catch((error) => {
            const errorCode = error.code;
            const errorMessage = error.message;
            if(errorCode == 'auth/invalid-credential'){
                notifyMessage('Invalid email or password.');
            }
        });
  }

  return (
  ...
ונחבר את השדות ואת הכפתור כמו ב-signup. את notifyMessage הוצאתי לקובץ חיצוני של utils כדי לא לחזור על הקוד.
לא לשכוח להוריד את ה-redirect בעמוד ה-index על מנת שיהיה ניווט לעמוד הבית.
מה שנשאר זה לבדוק בעמודים הפנימיים האם המשתמש שלנו רשום או לא. את זה נעשה בעמוד ה-layout שבתיקיית app.
import { auth } from '../../config/FirebaseConfig'
import { onAuthStateChanged } from "firebase/auth";

export default function TabLayout() {
    const router = useRouter();
    const [authenticated, setAuthenticated] = useState();

    onAuthStateChanged(auth, (user) => {
        if (user) {
            // User is signed in, see docs for a list of available properties
            // https://firebase.google.com/docs/reference/js/auth.user
            const uid = user.uid;
            setAuthenticated(true);
        } else {
            setAuthenticated(false);
        }
    });

    useEffect(() => {
        if(authenticated == false){
            router?.push('/login');
        }
    }, [authenticated]);

    // for logout on menu
    // onPress={() => signOut(auth)}

  return (
...
AsyncStorage
כשטוענים מחדש את הדף, חכול לקחת קצת זמן עד ש-onAuthStateChanged תטען ותחזיר תשובה, ובינתים יהיה ניתוב למסך הכניסה. כדי למנוע את זה נשתמש ב-AsyncStorage שמשמש לאחסון מקומי של המידע.
בתוך התיקייה העליונה ניצור תיקייה של services. בתוכה קובץ Storage.jsx.
נתקין:
npx expo install @react-native-async-storage/async-storage
בקובץ Storage נשמור את ערך המשתמש ונשלוף אותו.
import AsyncStorage from "@react-native-async-storage/async-storage"

export const setLocalStorage = async(key, value) => {
    await AsyncStorage.setItem(key, JSON.stringify(value));
}

export const getLocalStorage = async(key) => {
    var result = await AsyncStorage.getItem(key);
    return JSON.parse(result);
}

export const removeLocalStorage = async() => {
    await AsyncStorage.clear();
}
עכשיו צריך לשמור את הערך כשמשתמש נכנס למערכת ולשלוף בעת הצורך.
בקובץ signin:
const onSignIn = () => {
if(!email || !password){
    notifyMessage('Please fill all details');
    return;
}

signInWithEmailAndPassword(auth, email, password)
    .then(async(userCredential) => {
        // Signed in
        const user = userCredential.user;
        await setLocalStorage('userDetails', user);
        router.push('(tabs)');
    })
    .catch((error) => {
        const errorCode = error.code;
        const errorMessage = error.message;
        if(errorCode == 'auth/invalid-credential'){
            notifyMessage('Invalid email or password.');
        }
    });
}
בקובץ signup:
const onCreateAccount = () => {
    if(!email || !password || !userName){
        notifyMessage('Please fill all details');
        return;
    }

    createUserWithEmailAndPassword(auth, email, password)
        .then(async(userCredential) => {
            // Signed up
            const user = userCredential.user;
            await updateProfile(user, {
                displayName: userName
            })
            setLocalStorage('userDetails', user);
            router.push('(tabs)');
        })
        .catch((error) => {
            const errorCode = error.code;
            const errorMessage = error.message;
            console.log(errorCode);
            if(errorCode == 'auth/email-alreay-in-use'){
                notifyMessage('Email already exist.');
            }
        });
}
עכשיו במקום onAuthStateChanged נשתמש ב-getLocalStorage.
export default function TabLayout() {
    const router = useRouter();

    const getUserDetails = async() => {
        const userInfo = await getLocalStorage('userDetails');
        if(!userInfo)
            router.replace('/login');
    }

    useEffect(() => {
        getUserDetails();
    }, []);
Validation
הוספתי ולידציה לשדות על מנת להציג את השגיאות במקום בולט.
הקוד של הולידציה בראש הקובץ:
const [errors, setErrors] = useState({email: '', password: ''});

const validateForm = () => {
    let errors = {email, password};

    if (!email) errors.email = "Email is required";
    if (!password) errors.password = "Password is required";

    setErrors(errors);

    return Object.keys(errors).length === 0;
};
הפעלתי אותו בתוך פונקציית ההרשמה:
const onSignIn = () => {
    if(!email || !password){
        validateForm();
        notifyMessage('Please fill all details');
        return;
    }
וההצגה תהיה מתחת לשדות הקלט:
{ errors.email ? (<Text style={styles.errorText}>{errors.email}</Text>) : null }
Add New
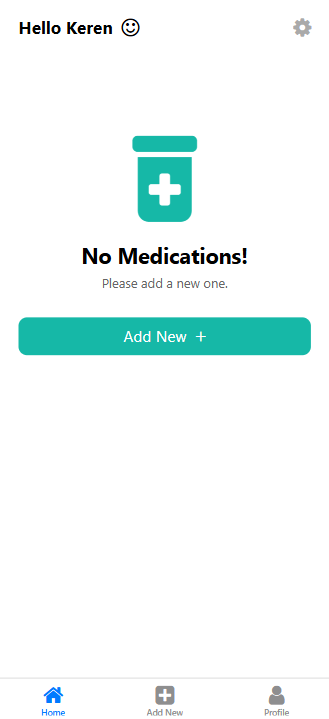
בכניסה הראשונה של המשתמש הוא יראה את מסך הבית עם הודעה שכרגע אין לו תרופות רשומות.
ברמה הראשית של הקבצים ניצור תיקיית components לאחסון קומפוננטות כלליות שניצור.
הקומפוננטה הראשונה תהיה Header. יש לנו בכותרת שלום: שם משתמש, אימוגי וכפתור להגדרות.
קובץ Header.jsx
import FontAwesome from '@expo/vector-icons/FontAwesome';
import { View, StyleSheet, Text } from 'react-native'
import React, { useEffect, useState } from 'react'
import { getLocalStorage } from '../services/Storage'

export default function Header() {
    const [user, setUser] = useState();

    useEffect(() => {
        getUserDetails();
    }, []);

    const getUserDetails = async () => {
        const userDetails = await getLocalStorage('userDetails');
        setUser(userDetails);
    }

  return (
    <View style={styles.mainContainer}>
        <View style={styles.textContainer}>
            <Text style={styles.userName}>Hello {user?.displayName}</Text>
            <FontAwesome name="smile-o" size={24} color="black" />
        </View>
        <FontAwesome name="gear" size={24} color="#aaa" />
    </View>
  )
}

const styles = StyleSheet.create({
    mainContainer: {
        display: 'flex',
        flexDirection: 'row',
        alignItems: 'center',
        justifyContent: 'space-between',
        width: '100%'
    },

    textContainer: {
        display: 'flex',
        flexDirection: 'row',
        alignItems: 'center'
    },

    userName: {
        fontSize: 20,
        fontWeight: 'bold',
        marginRight: 10
    }
})
אחרי הכותרת נרצה להציג את תוכן העמוד. המצב הראשון יהיה ללא מידע מכיוון שעוד לא הוכנסו תרופות. ניצור בתיקיית components את EmptyState.jsx. בלחיצה על כפתור הוספה נרצה לעבור למסך הוספת תרופה חדשה.
import FontAwesome6 from '@expo/vector-icons/FontAwesome6';
import { StyleSheet, Text, View, TouchableOpacity } from 'react-native'
import Colors from '../constants/Colors'
import React from 'react'

export default function EmptyState() {
  return (
    <View style={styles.mainContainer}>
      <FontAwesome6 name="prescription-bottle-medical" style={styles.mainIcon} />

      <Text style={styles.mainText}>No Medications!</Text>
      <Text style={styles.subText}>Please add a new one.</Text>

      <TouchableOpacity style={styles.buttonContainer}
            // onPress={() => router.push('add')}
        >
            <Text style={styles.button}>Add New</Text>
            <FontAwesome6 name="add" style={styles.buttonIcon} />
        </TouchableOpacity>
    </View>
  )
}

const styles = StyleSheet.create({
    mainContainer: {
        display: 'flex',
        alignItems: 'center',
        marginTop: 100
    },

    mainIcon:{
        fontSize: 100,
        marginTop: 10,
        color: Colors.PRIMARY
    },

    mainText: {
        fontSize: 25,
        fontWeight: 'bold',
        marginTop: 20
    },

    subText: {
        color: Colors.DARK_GRAY,
        fontSize: 15,
        marginTop: 6,
        marginBottom: 20
    },

    buttonContainer: {
        display: 'flex',
        flexDirection: 'row',
        padding: 10,
        paddingHorizontal: 20,
        backgroundColor: Colors.PRIMARY,
        borderRadius: 10,
        marginTop: 10,
        width: '100%',
        alignItems: 'center',
        justifyContent: 'center',
        gap: 10
    },

    button: {
        fontSize: 18,
        color: '#fff'
    },

    buttonIcon: {
        fontSize: 14,
        color: '#fff'
    }
})
זה הקוד של הקומפוננטה:
import { View, Text, StyleSheet } from 'react-native'
import React from 'react'
import Header from '../../components/Header'
import EmptyState from '../../components/EmptyState'

export default function HomeScreen() {
  return (
    <View style={styles.pageContainer}>
      <Header />
      <EmptyState />
    </View>
  )
}

const styles = StyleSheet.create({
  pageContainer: {
    padding: 25,
    backgroundColor: '#fff',
    height: '100%'
  }
})
כדי ליצור קבוצת נתיבים חדשה, בתוך תיקיית app ניצור תיקיית addNewMed ובתוכה קובץ index עם קוד התחלתי. נחבר את הכפתור של הקומפוננטה שמציגה סל ריק עם הקובץ החדש שיצרנו.
...
import { useRouter } from 'expo-router';

export default function EmptyState() {
  const router = useRouter();
  ...
return (
    <View style={styles.mainContainer}>
      ...
      <TouchableOpacity style={styles.buttonContainer}
            onPress={() => router.push('/addNewMed')}
        >
            <Text style={styles.button}>Add New</Text>
            <FontAwesome6 name="add" style={styles.buttonIcon} />
        </TouchableOpacity>
    </View>
  )
}
נעבור לקובץ addNewMed. נתחיל בהוספת רכיבי הטופס.
שדה קלט לשם התרופה.
<View>
    <Text style={styles.label}>Medication Name:</Text>
    <View style={styles.inputGroup}>
        <FontAwesome6 style={styles.textIcon} name="briefcase-medical" size={24} color="black" />
        <TextInput style={styles.textInput}
            placeholder='Name'
            onChangeText={(value) => onHandleInputChange('name', value)}
        />
    </View>
</View>
בקלט של הטופס נטפל בפונקציית onHandleInputChange.
לבחירת ערך מתוך רשימת סוג התרופה נשתמש ב-FlatList.
<View>
    <Text style={styles.label}>Type:</Text>
    <FlatList
        data={MedicineOptions}
        horizontal
        showsHorizontalScrollIndicator={false}
        renderItem={({item, index}) => (
            <TouchableOpacity style={styles.inputTypeGroup}
                onPress={() => onHandleInputChange('type', item)}
            >
                <Text style={styles.typeText}>{item?.name}</Text>
            </TouchableOpacity>
        )}
    />
</View>
נשנה את הרקע של סוג התרופה הנבחר בצורה הזאת:
<TouchableOpacity style={[styles.inputTypeGroup,
    { backgroundColor: item.name == formData?.type?.name ? Colors.PRIMARY : '#fff' }
]}
    onPress={() => onHandleInputChange('type', item)}
>
    <Text style={[styles.typeText,
        { color: item.name == formData?.type?.name ? '#fff' : '#000' }
    ]}>{item?.name}</Text>
</TouchableOpacity>
מינון התרופה הוא שדה טקסט.
<View>
    <Text style={styles.label}>Dose:</Text>
    <View style={styles.inputGroup}>
        <FontAwesome6 style={styles.textIcon} name="eye-dropper" size={24} color="black" />
        <TextInput style={styles.textInput}
            placeholder='Dose Ex. 2, 5ml...'
            onChangeText={(value) => onHandleInputChange('dose', value)}
        />
    </View>
</View>
הפקד הבא הוא רשימת בחירה של זמן לקיחת התרופה. עבור זה נשתמש ב-react-native-picker ונתקין אותו.
npx expo install @react-native-picker/picker
רשימת זמני לקיחת התרופה.
<View>
    <Text style={styles.label}>When to Take:</Text>
    <View style={styles.inputGroup}>
        <FontAwesome6 style={styles.textIcon} name="clock" size={24} color="black" />
        <Picker style={styles.picker}
            selectedValue={formData?.when}
            onValueChange={(itemValue, itenIndex) => onHandleInputChange('when', itemValue)}
        >
            {WhenToTake.map((item, index) => (
                <Picker.Item key={index} label={item} value={item} style={styles.pickerText}/>
            ))}
        </Picker>
    </View>
</View>
הפקד הבא צריך להציג את תאריכי לקיחת התרופה. לצורך זה נשתמש ב-DateTimePicker.
על מנת להמיר תאריכים לפורמטים שונים נשתמש בספריית moment.
npm install moment --save
רכיב לוח שנה.
<Text style={styles.label}>Dates:</Text>
<View style={styles.datesContainer}>
    <View style={{flex: 1}}>
        <TouchableOpacity style={styles.inputGroup}
            onPress={() => setShowStartDate(true)}
        >
            <FontAwesome6 style={styles.textIcon} name="calendar-alt" size={24} color="black" />
            <Text style={styles.dateInput}>{FormatDateForText(formData?.startDate) ?? 'Start Date'}</Text>
        </TouchableOpacity>
        {showStartDate && <RNDateTimePicker design="material"
            minimumDate={new Date()}
            value={ew Date(formData?.startDate) ?? new Date()}
            onChange={(event) => {
                onHandleInputChange('startDate', FormatDate(event.nativeEvent.timestamp));
                setShowStartDate(false);
            }}
            />
        }
    </View>

    <View style={{flex: 1}}>
        <TouchableOpacity style={styles.inputGroup}
            onPress={() => setShowEndDate(true)}
        >
            <FontAwesome6 style={styles.textIcon} name="calendar-alt" size={24} color="black" />
            <Text style={styles.dateInput}>{FormatDateForText(formData?.endDate) ?? 'End Date'}</Text>
        </TouchableOpacity>

        {showEndDate && <RNDateTimePicker design="material"
            minimumDate={new Date()}
            value={ew Date((formData?.endDate) ?? new Date()}
            onChange={(event) => {
                onHandleInputChange('endDate', FormatDate(event.nativeEvent.timestamp));
                setShowEndDate(false);
            }}
            />
        }
    </View>
</View>
נכתוב פונקציות עזר להצגת התאריכים, בקובץ ConvertDateTime שנמצא בתיקיית Services.
import moment from "moment";

export const FormatDate = (timestamp) => {
    return new Date(timestamp);
}

export const FormatDateForText = (date) => {
    return moment(date).format('ll');
}
הדבר הבא להוסיף הוא אפשרות לבחור זמן לתזכורות.
const [showTimePicker, setShowTimePicker] = useState(false);
...
<View>
    <Text style={styles.label}>Add a reminder:</Text>
    <View>
        <TouchableOpacity style={styles.inputGroup}
            onPress={() => setShowTimePicker(true)}
        >
            <FontAwesome6 style={styles.textIcon} name="user-clock" size={24} color="black" />
            <Text style={styles.dateInput}>{formData?.reminder ?? 'Select Time'}</Text>
        </TouchableOpacity>
    </View>

    {showTimePicker && <RNDateTimePicker design="material"
        mode='time'
        value={new Date(formData?.reminder) ?? new Date()}
        onChange={(event) => {
            onHandleInputChange('reminder', formatTime(event.nativeEvent.timestamp));
            setShowTimePicker(false);
        }}
        />
    }
</View>
ופונקציה נוספת בקובץ ConvertDateTime להצגת הזמן:
export const formatTime = (timestamp) => {
    return new Date(timestamp).toLocaleTimeString([], {hour: '2-digit', minute: '2-digit'});
}
הדבר האחרון שנשאר להוסיף זה כפתור לשמירה.
<TouchableOpacity style={[globalStyles.buttonContainer, {marginTop: 20}]}>
    <Text style={globalStyles.button}>Add New Medication</Text>
    <FontAwesome6 name="add" style={globalStyles.buttonIcon} />
</TouchableOpacity>
ככה נראה המסך:

בשביל לשמור את הנתונים נשתמש ב-firebase. השימוש בו הוא חינם בכמויות קטנות.
נכנס ל-firebase ונוסיף את השימוש ב-Database.
צריך לפתוח DB חדש ולהגדיר את ה-DB באפליקציה. באתר firebase נבחר ליצור DB חדש. את ההגדרה נעשה בקובץ firebaseConfig.
...
import { getFirestore } from "firebase/firestore"
...

export const db = getFirestore(app);
בתוך קובץ AddMedForm שבו הכנסנו את הנתונים נוסיף:
...
import { doc, setDoc } from 'firebase/firestore';
import { db } from '../config/FirebaseConfig';
import { getLocalStorage } from '../services/Storage';

export default function AddMedForm (){
    const globalStyles = require('../styles/global');

    ...
    const saveMedication = async() => {
        const docId = Date.now().toString();
        const user = await getLocalStorage('userDetails');
        console.log('saving');

        if(!(formData?.name || formData?.type || formData?.dose ||
            formData?.startDate || formData?.endDate || formData?.reminder)){
                Alert.alert('Enter all fields');
                return;
            }

        try {
            await setDoc(doc(db, 'medication', docId), {
                ...formData,
                userEmail: user.email,
                docId: docId
            });
        } catch (error) {
            console.log(error);
        }
    }

    return (
       ...
                <TouchableOpacity style={[globalStyles.buttonContainer, {marginTop: 20}]}
                    onPress={saveMedication}
                >
                    <Text style={globalStyles.button}>Add New Medication</Text>
                    <FontAwesome6 name="add" style={globalStyles.buttonIcon} />
                </TouchableOpacity>
        ...
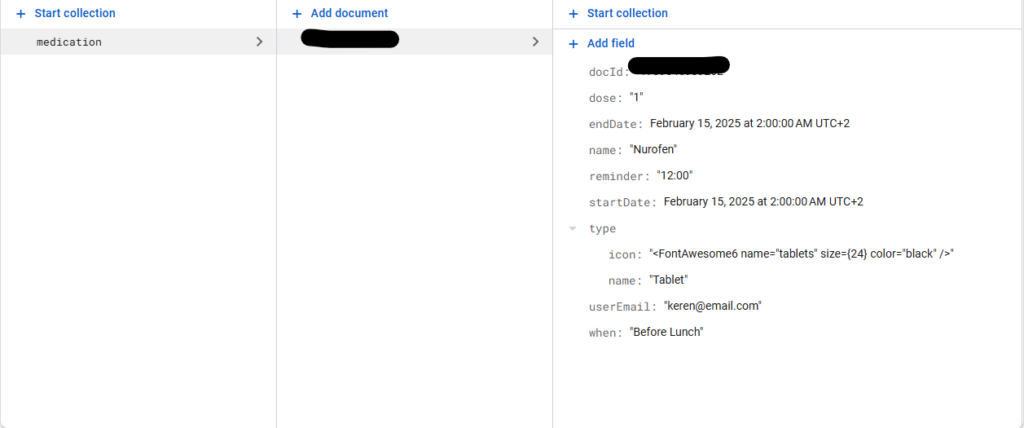
הנתונים ישמרו באוסף medication. אם הוא לא קיים, firebase יצור אחד.
ככה זה נראה אחרי השמירה:
דברים נוספים לשפר את חווית המשתמש: הוספת משתנה isLoading והצגת טעינה כאשר מתבצעת השמירה. שימוש ב-router להחזיר לעמוד הראשי אחרי הוספת תרופה.
עוד דבר שאנחנו רוצים לעשות זה לשמור מערך עם כל הימים בין התאריכים שהמשתמש בחר, זה יעזור למיין את התרופות במסך הכניסה על פי הזמן שצריך לקחת אותן. בקובץ ConvertDateTime נגדיר את הפונקציה שיוצרת את המערך, ונקרא לפונקציה בתוך תהליך השמירה.
export const getDateRange = (startDate, endDate) => {
    const start = moment(new Date(startDate), 'MM/DD/YYYY');
    const end = moment(new Date(endDate), 'MM/DD/YYYY');
    const dates = [];

    while(start.isSameOrBefore(end)){
        dates.push(start.format('MM/DD/YYYY'));
        start.add(1, 'days');
    }
    return dates;
}
זה הקוד השלם של הקובץ.
import { View, Text, TouchableOpacity, StyleSheet, TextInput,
    ToastAndroid, Platform, FlatList, Alert,
    ActivityIndicator} from 'react-native'
import FontAwesome6 from '@expo/vector-icons/FontAwesome6';
import React, { useState } from 'react';
import Colors from '../constants/Colors';
import { MedicineOptions, WhenToTake } from '../constants/MedicineOptions';
import { Picker } from '@react-native-picker/picker';
import RNDateTimePicker from '@react-native-community/datetimepicker';
import { FormatDate, FormatDateForText, formatTime, getDateRange } from '../services/ConvertDateTime';
import { doc, setDoc } from 'firebase/firestore';
import { db } from '../config/FirebaseConfig';
import { getLocalStorage } from '../services/Storage';
import { useRouter } from 'expo-router'

export default function AddMedForm (){
    const globalStyles = require('../styles/global');
    const router = useRouter();

    const [formData, setFormData] = useState();
    const [showStartDate, setShowStartDate] = useState(false);
    const [showEndDate, setShowEndDate] = useState(false);
    const [showTimePicker, setShowTimePicker] = useState(false);
    const [isLoading, setIsLoading] = useState(false);

    const onHandleInputChange = (field, value) => {
        setFormData(prev => ({
            ...prev,
            [field]: value
        }))
    }

    const saveMedication = async() => {
        const docId = Date.now().toString();
        const user = await getLocalStorage('userDetails');
        console.log('saving');

        if(!formData?.name || !formData?.type || !formData?.dose ||
            !formData?.startDate || !formData?.endDate || !formData?.reminder){
                if(Platform.OS === 'android')
                    ToastAndroid.show('Enter all fields.', ToastAndroid.LONG, ToastAndroid.TOP);
                else
                    Alert.alert('Enter all fields');
                return;
            }

        const dates = getDateRange(formData?.startDate, formData?.endDate);
        setIsLoading(true);
        try {
            await setDoc(doc(db, 'medication', docId), {
                ...formData,
                userEmail: user.email,
                docId: docId,
                dates: dates
            });
            setIsLoading(false);
            if(Platform.android)
                ToastAndroid.show('Medicatin Saved!', ToastAndroid.SHORT);
            if(Platform.iso)
                Alert.alert('Medicatin Saved!');
            router.push('(tabs)');
        } catch (error) {
            console.log(error);
            setIsLoading(false);
        }
    }

    return (
        <View>
            <Text style={styles.headline}>Add a New Medication</Text>

        <View>
                <View>
                    <Text style={styles.label}>Medication Name:</Text>
                    <View style={styles.inputGroup}>
                        <FontAwesome6 style={styles.textIcon} name="briefcase-medical" size={24} color="black" />
                        <TextInput style={styles.textInput}
                            placeholder='Name'
                            onChangeText={(value) => onHandleInputChange('name', value)}
                        />
                    </View>
                </View>

                <View>
                    <Text style={styles.label}>Type:</Text>
                    <FlatList
                        data={MedicineOptions}
                        horizontal
                        showsHorizontalScrollIndicator={false}
                        renderItem={({item, index}) => (
                            <TouchableOpacity style={[styles.inputTypeGroup,
                                { backgroundColor: item.name == formData?.type?.name ? Colors.PRIMARY : '#fff' }
                            ]}
                                onPress={() => onHandleInputChange('type', item)}
                            >
                                <Text style={[styles.typeText,
                                    { color: item.name == formData?.type?.name ? '#fff' : '#000' }
                                ]}>{item?.name}</Text>
                            </TouchableOpacity>
                        )}
                    />
                </View>

                <View>
                    <Text style={styles.label}>Dose:</Text>
                    <View style={styles.inputGroup}>
                        <FontAwesome6 style={styles.textIcon} name="eye-dropper" size={24} color="black" />
                        <TextInput style={styles.textInput}
                            placeholder='Dose Ex. 2, 5ml...'
                            onChangeText={(value) => onHandleInputChange('dose', value)}
                        />
                    </View>
                </View>

                <View>
                    <Text style={styles.label}>When to Take:</Text>
                    <View style={styles.inputGroup}>
                        <FontAwesome6 style={styles.textIcon} name="clock" size={24} color="black" />
                        <Picker style={styles.picker}
                            selectedValue={formData?.when}
                            onValueChange={(itemValue, itenIndex) => onHandleInputChange('when', itemValue)}
                        >
                            {WhenToTake.map((item, index) => (
                                <Picker.Item key={index} label={item} value={item} style={styles.pickerText}/>
                            ))}
                        </Picker>
                    </View>
                </View>

                <Text style={styles.label}>Dates:</Text>
                <View style={styles.datesContainer}>
                    <View style={{flex: 1}}>
                        <TouchableOpacity style={styles.inputGroup}
                            onPress={() => setShowStartDate(true)}
                        >
                            <FontAwesome6 style={styles.textIcon} name="calendar-alt" size={24} color="black" />
                            <Text style={styles.dateInput}>{FormatDateForText(formData?.startDate) ?? 'Start Date'}</Text>
                        </TouchableOpacity>
                        {showStartDate && <RNDateTimePicker design="material"
                            minimumDate={new Date()}
                            value={new Date(formData?.startDate) ?? new Date()}
                            onChange={(event) => {
                                onHandleInputChange('startDate', FormatDate(event.nativeEvent.timestamp));
                                setShowStartDate(false);
                            }}
                            />
                        }
                    </View>

                    <View style={{flex: 1}}>
                        <TouchableOpacity style={styles.inputGroup}
                            onPress={() => setShowEndDate(true)}
                        >
                            <FontAwesome6 style={styles.textIcon} name="calendar-alt" size={24} color="black" />
                            <Text style={styles.dateInput}>{FormatDateForText(formData?.endDate) ?? 'End Date'}</Text>
                        </TouchableOpacity>

                        {showEndDate && <RNDateTimePicker design="material"
                            minimumDate={new Date()}
                            value={new Date(formData?.endDate) ?? new Date()}
                            onChange={(event) => {
                                onHandleInputChange('endDate', FormatDate(event.nativeEvent.timestamp));
                                setShowEndDate(false);
                            }}
                            />
                        }
                    </View>
                </View>

                <View>
                    <Text style={styles.label}>Add a reminder:</Text>
                    <View>
                        <TouchableOpacity style={styles.inputGroup}
                            onPress={() => setShowTimePicker(true)}
                        >
                            <FontAwesome6 style={styles.textIcon} name="user-clock" size={24} color="black" />
                            <Text style={styles.dateInput}>{formData?.reminder ?? 'Select Time'}</Text>
                        </TouchableOpacity>
                    </View>

                    {showTimePicker && <RNDateTimePicker design="material"
                        mode='time'
                        value={new Date(formData?.reminder) ?? new Date()}
                        onChange={(event) => {
                            onHandleInputChange('reminder', formatTime(event.nativeEvent.timestamp));
                            setShowTimePicker(false);
                        }}
                        />
                    }
                </View>

                <TouchableOpacity style={[globalStyles.buttonContainer, {marginTop: 20}]}
                    onPress={saveMedication}
                >
                    {isLoading ? <ActivityIndicator size={'large'} color={'#fff'}/> :
                    <View style={globalStyles.buttonContainer}>
                        <Text style={globalStyles.button}>Add New Medication</Text>
                        <FontAwesome6 name="add" style={globalStyles.buttonIcon} />
                    </View>}
                </TouchableOpacity>
            </View>
        </View>

    );
};

const styles = StyleSheet.create({
    formContainer: {
        display: 'flex',
        marginTop: 30,
    },

    headline: {
        paddingTop: 20,
        fontSize: 20,
        fontWeight: 'bold',
        marginBottom: 10
    },

    label: {
        fontSize: 14,
        color: '#888',
        marginBottom: 5,
        marginTop: 10
    },

    inputGroup:{
        display: 'flex',
        flexDirection: 'row',
        alignItems: 'center',
        padding: 12,
        borderRadius: 8,
        borderWidth: 1,
        borderColor: '#e5e7eb'
    },

    textInput: {
        flex: 1,
        marginLeft: 10,
        fontSize: 16,
        color: '#555'
    },

    textIcon: {
        color: Colors.PRIMARY,
        borderRightWidth: 2,
        paddingRight: 15,
        borderColor: "#bbb"
    },

    typeText:{
        fontSize: 16
    },

    inputTypeGroup: {
        display: 'flex',
        flexDirection: 'row',
        alignItems: 'center',
        paddingHorizontal: 10,
        paddingVertical: 5,
        borderRadius: 8,
        borderWidth: 1,
        borderColor: '#e5e7eb',
        marginRight: 10
    },

    picker: {
        width: '90%',
        marginLeft: 10,
        border: 'none'
    },

    pickerText:{
        fontSize: 16
    },

    datesContainer: {
        display: 'flex',
        flexDirection: 'row',
        gap: 10
    },

    dateInput: {
        flex: 1,
        marginLeft: 10,
        fontSize: 16,
        color: '#555'
    }
})
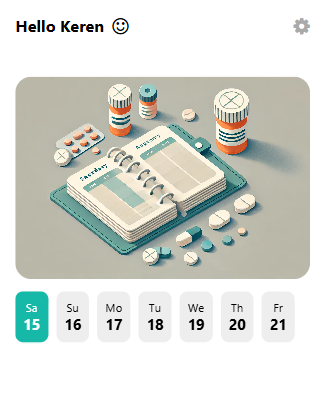
Display Medication List
במסך הראשי נציג את ימות השבוע כדי שאפשר יהיה לראות איזה תרופות יש בכל יום ולאחר מכן את התרופות של אותו היום. את המידע נבנה בתוך קומפוננטה חדשה: MedicationList.jsx.
שמתי תמונה בראש העמוד ועכשיו אני רוצה להציג את רשימת התאריכים. כדי לעבד את הרשימה נשתמש בפונקציית עזר שנכתוב בקובץ ConvertDateTime.
export const getDateRangeToDisplay = () => {
    const dateList = [];

    for(let i = 0; i <= 7; i++){
        dateList.push({
            date: moment().add(i, 'days').format('DD'), // 25
            day: moment().add(i, 'days').format('dd'), // Tue
            formatedDate: moment().add(i, 'days').format('L') // 12/2/24
        });
    }

    return dateList;
}
נקרא לפונקציה בכניסה לדף.
const [dateRange, setDateRange] = useState();

useEffect(() => {
    setDateRange(getDateRangeToDisplay());
}, [])
עכשיו ניצור את הרשימה, את העיצוב שלה ואת פעולת הבחירה בתאריך כך שיראו בעיצוב את התאריך הנבחר.
export default function MedicationList() {
    const [medList, setMedList] = useState();
    const [dateRange, setDateRange] = useState();
    const [selectedDate, setSelectedDate] = useState(moment().format('MM/DD/YYYY'));

    useEffect(() => {
        setDateRange(getDateRangeToDisplay());
    }, [])

    return (
        <View style={styles.mainContainer}>
            <Image source={require('./../assets/images/full.webp')}
                        style={styles.image}
                    />

            <FlatList data={dateRange}
                horizontal
                showsHorizontalScrollIndicator={false}
                style={styles.dateList}
                renderItem={({item, index}) => (
                    <TouchableOpacity style={[styles.dateGroup,
                        {backgroundColor: item?.formattedDate == selectedDate ? Colors.PRIMARY : "#eee"}]}
                        onPress={() => setSelectedDate(item.formattedDate)}
                        >
                        <Text style={[styles.day,
                            {color: item?.formattedDate == selectedDate ? '#fff' : "#000"}
                        ]}>{item.day}</Text>
                        <Text style={[styles.date,
                            {color: item?.formattedDate == selectedDate ? '#fff' : "#000"}
                        ]}>{item.date}</Text>
                    </TouchableOpacity>
                )}
            />
        </View>
    )
}

const styles = StyleSheet.create({
    mainContainer: {
        display: 'flex',
        // alignItems: 'center',
        marginTop: 50
    },

    imageContainer: {
        display: 'flex',
        alignItems: 'center',
        marginTop: 10
    },

    image: {
        width: '100%',
        height: 250,
        borderRadius: 20
    },

    dateList: {
        marginTop: 15
    },

    dateGroup: {
        padding: 10,
        backgroundColor: "#eee",
        display: 'flex',
        alignItems: 'center',
        marginRight: 10,
        borderRadius: 10
    },

    day: {
        fontSize: 14
    },

    date: {
        fontSize: 18,
        fontWeight: 'bold'
    }
})
עכשיו צריך לשלוף את הנתונים המתאימים מה-DB לכל יום נבחר.
נשלוף קודם את כל התרופות תחת מייל המשתמש הקיים.
...
import { collection, query, where, getDocs } from "firebase/firestore";
import { db } from '../config/FirebaseConfig';

export default function MedicationList() {
    const [medList, setMedList] = useState();
    const [dateRange, setDateRange] = useState();
    const [selectedDate, setSelectedDate] = useState(moment().format('MM/DD/YYYY'));

    useEffect(() => {
        setDateRange(getDateRangeToDisplay());
        getMedicationList(selectedDate);
    }, [])

    const getMedicationList = async(selectedDate) => {
        const user = await getLocalStorage('userDetails');
        try {
            const q = query(collection(db, "medication"), where("userEmail", "==", user.email));
            const querySnapshot = await getDocs(q);
            querySnapshot.forEach((doc) => {
                // doc.data() is never undefined for query doc snapshots
                console.log(doc.id, " => ", doc.data());
            });
        } catch (error) {
            console.log(error);
        }
    }

    return (
    ...
נמקד את הבחירה רק לתרופות שהתאריך הנבחר נמצא בהן.
const getMedicationList = async(selectedDate) => {
    const user = await getLocalStorage('userDetails');
    try {
        const q = query(collection(db, "medication"),
            where("userEmail", "==", user.email),
            where("dates", "array-contains", selectedDate));

        const querySnapshot = await getDocs(q);
        setMedList([]);
        querySnapshot.forEach((doc) => {
            setMedList(prev => [...prev, doc.data()]);
        });
    } catch (error) {
        console.log(error);
    }
}
על מנת להציג כל תרופה נשתמש בקומפוננטה שניצור MedCardItem.jsx.
import { View, Text, StyleSheet } from 'react-native'
import FontAwesome6 from '@expo/vector-icons/FontAwesome6';
import React from 'react'
import Colors from '../constants/Colors';

export default function MedCardItem({med}) {
    return (
        <View style={styles.mainContainer}>
            <View style={styles.leftContainer}>
                <View style={styles.iconContainer}>
                    <FontAwesome6 name={med.type.icon} size={34} color={Colors.PRIMARY} />
                </View>
                <View style={styles.textContainer}>
                    <View>
                        <Text style={styles.nameText}>{med.name}</Text>
                        <Text style={styles.whenText}>{med.when}</Text>
                        <Text style={styles.doseText}>{med.dose} ({med.type.name})</Text>
                    </View>
                </View>
            </View>
            <View style={styles.reminderContainer}>
                    <FontAwesome6 style={styles.textIcon} name="user-clock" size={24} color="black" />
                    <Text style={styles.reminderText}>{med.reminder}</Text>
            </View>
        </View>
    )
}

const styles = StyleSheet.create({
    mainContainer: {
        borderColor: "#bbb",
        borderWidth: 1,
        display: 'flex',
        flexDirection: 'row',
        alignItems: 'center',
        padding: 15,
        borderRadius: 10,
        justifyContent: 'space-between',
        width: '100%',
        marginBottom: 10
    },
    leftContainer: {
        display: 'flex',
        flexDirection: 'row',
        alignItems: 'center',
    },
    iconContainer: {
        alignItems: 'center',
        alignContent: 'center',
        paddingRight: 20
    },
    textContainer: {
        display: 'flex',
        flexDirection: 'row',

    },
    reminderContainer: {
        alignItems: 'center'
    },

    nameText: {
        fontSize: 18,
        fontWeight: 'bold'
    },
    whenText: {
        fontSize: 16
    },
    reminderText: {
        fontSize: 16
    }
})
את כרטיסי בתרופה נציג בעמוד הראשי:
<View style={{ flex: 1 }}>
    {isLoading ? (<ActivityIndicator style={{marginTop: 20}} size={'large'} color={Colors.PRIMARY} />) : medList?.length > 0 ?
        <FlatList data={medList}
            style={styles.listContainer}
            showsVerticalScrollIndicator={false}
            // onRefresh={() => getMedicationList(selectedDate)}
            refreshing={isLoading}
            renderItem={({item, index}) => (
                <TouchableOpacity>
                    <MedCardItem med={item} />
                </TouchableOpacity>
            )}
            ListFooterComponent={<View style={{ height: 50 }} />}
        /> : <EmptyState />
    }
</View>

Action Status
הפעולה הבאה היא הצגת נתוני כל תרופה בלחיצה עליה ואפשרות לבחור האם נלקחה או לא. נפתח תיקייה תחת app בשם action-modal ובתוכה קובץ index.jsx. את המסך הזה נוסיף למסכי ה-stack. באפשרויות נכתוב שזה modal, כלומר חלון קופץ.
export default function RootLayout() {
  return (
    <Stack screenOptions={{ headerShown: false}}>
      <Stack.Screen name="(tabs)" />
      <Stack.Screen name="login" />
      <Stack.Screen name="action-modal"
        options={{
          presentation: 'modal'
        }}
      />
    </Stack>
  )
}
נחזור ל-MedicationList וכאן באירוע press נוסיף את פתיחת החלון ונעביר אליו את כל המידע שאנחנו צריכים.
<View style={{ flex: 1 }}>
    {isLoading ? (<ActivityIndicator style={{marginTop: 20}}
        size={'large'} color={Colors.PRIMARY} />) : medList?.length > 0 ?
        <FlatList data={medList}
            style={styles.listContainer}
            showsVerticalScrollIndicator={false}
            refreshing={isLoading}
            renderItem={({item, index}) => (
                <TouchableOpacity onPress={() => router.push({
                    pathname: '/action-modal',
                    params: { ...item,
                        selectedDate: selectedDate
                    }
                })}>
                    <MedCardItem med={item} />
                </TouchableOpacity>
            )}
            ListFooterComponent={<View style={{ height: 50 }} />}
        /> : <EmptyState />
    }
</View>
את המידע ששלחנו נקבל בקומפוננטת המידע:
export default function MedicationActionModel() {
    const medicine = useLocalSearchParams();
    return (
        <View>
            <Text>MedicationActionModel</Text>
        </View>
    )
}
נוסיף למסך את המידע על התזכורת, את המידע על התרופה – נשתמש ב-Card שכבר יצרנו לצורך זה ואפשרות לבחור האם התרופה נלקחה או לא.
import { View, Text, StyleSheet, TouchableOpacity } from 'react-native'
import FontAwesome6 from '@expo/vector-icons/FontAwesome6';
import AntDesign from '@expo/vector-icons/AntDesign';
import React from 'react'
import { useLocalSearchParams, useRouter } from 'expo-router'
import Colors from '../../constants/Colors';
import MedCardItem from '../../components/MedCardItem';

export default function MedicationActionModel() {
    const medicine = useLocalSearchParams();
    const router = useRouter();

    return (
        <View style={styles.mainContainer}>
            <FontAwesome6 name="bell" size={24} color="black" style={styles.mainIcon}/>
            <Text style={styles.dateText}>{ medicine?.selectedDate }</Text>
            <Text style={styles.reminderText}>{ medicine?.reminder }</Text>
            <Text style={styles.instructionText}>It's time to take</Text>

            <MedCardItem med={medicine} />

            <View style={styles.buttonsContainer}>
                <TouchableOpacity style={styles.closeButton}>
                    <AntDesign name="closecircleo" size={24} color="red" />
                    <Text style={styles.closeButtonText}>Missed</Text>
                </TouchableOpacity>

                <TouchableOpacity style={styles.SuccessButton}>
                    <AntDesign name="checkcircleo" size={24} color="#fff" />
                    <Text style={styles.SuccessButtonText}>Taken</Text>
                </TouchableOpacity>
            </View>

            <TouchableOpacity style={styles.closeIcon} onPress={() => router.back()}>
                <AntDesign name="closecircle" size={40} color="#aaa" />
            </TouchableOpacity>
        </View>
    )
}

const styles = StyleSheet.create({
    mainContainer: {
        padding: 25,
        alignItems: 'center',
        justifyContent: 'center',
        backgroundColor: '#fff',
        height: '100%'
    },

    mainIcon:{
        fontSize: 100,
        marginTop: 10,
        color: Colors.PRIMARY
    },

    dateText: {
        fontSize: 18
    },

    reminderText: {
        fontSize: 30,
        fontWeight: 'bold'
    },

    instructionText: {
        fontSize: 18,
        marginBottom: 20
    },

    buttonsContainer: {
        marginTop: 10,
        flexDirection: 'row',
        gap: 10,
    },

    closeButton: {
        paddingVertical: 10,
        paddingHorizontal: 20,
        flexDirection: 'row',
        gap: 12,
        alignItems: 'center',
        borderWidth: 1,
        borderColor: 'red',
        borderRadius: 10
    },

    closeButtonText: {
        fontSize: 18,
        color: 'red'
    },

    SuccessButton: {
        paddingVertical: 10,
        paddingHorizontal: 20,
        flexDirection: 'row',
        gap: 12,
        alignItems: 'center',
        borderRadius: 10,
        backgroundColor: Colors.PRIMARY
    },

    SuccessButtonText: {
        fontSize: 18,
        color: '#fff'
    },

    closeIcon: {
        position: 'absolute',
        bottom: 25
    }
})
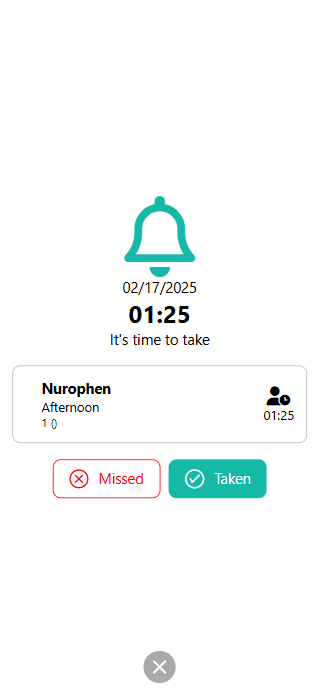
בתצוגה כאן יש חלקים שלא הגיעו, למשל האייקון וסוג התרופה.
אחרי הוספת הכפתורים, נצטרך להפעיל אותם כדי שיעדכנו את ה-DB האם התרופה נלקחה באותו בתאריך. נוסיף את הפונקציה שתטפל בעדכון, ונפעיל אותה מהכפתורים עם הסטטוס המתאים.
...
const updateActionStatus = async(status) => {
    try {
        const docRef = doc(db, 'medication', medicine?.docId);
        await updateDoc(docRef, {
            action: arrayUnion({
                status: status,
                time: moment().format('LT'),
                date: medicine?.selectedDate
            })
        })
    } catch (error) {
        console.log(error);
    }

    Alert.alert(status, 'Action Saved!', [
        {
            text: 'OK',
            onPress: () => router.replace('(tabs)')
        }
    ])
}
...
<View style={styles.buttonsContainer}>
    <TouchableOpacity style={styles.closeButton}
        onPress={() => updateActionStatus('Missed')}
    >
        <AntDesign name="closecircleo" size={24} color="red" />
        <Text style={styles.closeButtonText}>Missed</Text>
    </TouchableOpacity>

    <TouchableOpacity style={styles.SuccessButton}
        onPress={() => updateActionStatus('Taken')}
    >
        <AntDesign name="checkcircleo" size={24} color="#fff" />
        <Text style={styles.SuccessButtonText}>Taken</Text>
    </TouchableOpacity>
</View>
במסך הבית, שמראה את התרופות נרצה להראות את סטטוס התרופה, האם נלקחה או לא. את האינדיקטור הזה נוסיף בעיצוב ה-Card.
כדי לדעת באיזה תאריך אנחנו נמצאים ולבדוק אם יש התאמה לתאריך בו נלקחה התרופה, נשלח מקומפוננטת ה-List את התאריך הנבחר ונקבל אותו בקומפוננטת ה-Card.
<MedCardItem med={item} selectedDate={selectedDate}/>
export default function MedCardItem({med, selectedDate=''}) {
...
בראש ה-card נוסיף פונקציה שבודקת את הסטטוס ונפעיל את הבדיקה בכניסה לבניית הכרטיס.
export default function MedCardItem({med, selectedDate=''}) {
    const [status, setStatus] = useState();

    useEffect(() => {
        checkStatus();
    }, [med]);

    checkStatus = () => {
        const data = med?.action?.find(item => item.date == selectedDate);
        setStatus(data);
    }
    ...
לשים לב: ניסיתי את הקוד למעלה, אבל הוא לא עובד כמו שצריך, עד שמתבצעת הבדיקה של הסטטוס התצוגה כבר עוברת לכרטיס הבא והמידע משתבש. הפתרון: קריאה לפעולה בתוך useEffect.
useEffect(() => {
    if(med?.action && Array.isArray(med?.action)){
        const data = med?.action?.find(item => item.date == selectedDate);
        setStatus(data);
    }
}, [med]);
עכשיו זה עובד. עוד תיקון שכדאי לעשות, אם אחרי שמסמנים Missed נכנסים שוב לתרופה ומסמנים Taken, שתי ההערות נרשמות והראשונה נלקחת לתצוגה. אפשר לבדוק האם קיים סטטוס ובמידה וכן לעדכן אותו ולא להוסיף רשומה.
History
על מנת להציג את היסטוריית התרופות, נבנה עמוד היסטוריה ונשתמש בו בקומפוננטות שקיימות לנו.
על מנת לקבל את רשימת התאריכים הקודמים להיום נשתמש בפונקציית עזר בקובץ ConvertDateTime.
export const getPrevDateRangeToDisplay = () => {
    const dateList = [];

    for(let i = 0; i < 7; i++){
        const date = moment().subtract(i, days);

        dateList.push({
            date: date.format('DD'),
            day: date.format('dd'),
            formattedDate: date.format('L')
        })
    }

    return dateList;
}
במקום לבנות עמוד חדש, אולי אפשר להשתמש בקומפוננטה של ה-List ופשוט לשלוח לה תאריכים אחרים. צריך לשים לב שכרגע אם יש עמוד ריק, יש הצעה להוסיף תרופות, כמובן שבהיסטוריה אין מה להציג את הכפתור הזה.
Generate APK File
כדי להעלות את האפליקציה לחנויות האפליקציות, צריך לייצר קובץ עם סיומת aab לאנדרויד, וקובץ ipa ל-IOS.
יש כמה דרכים לעשות את זה. דרך אחת היא להשתמש ב-EAS של Expo. הבעיה היא שלוקח הרבה זמן לייצר ככה את הקבצים.
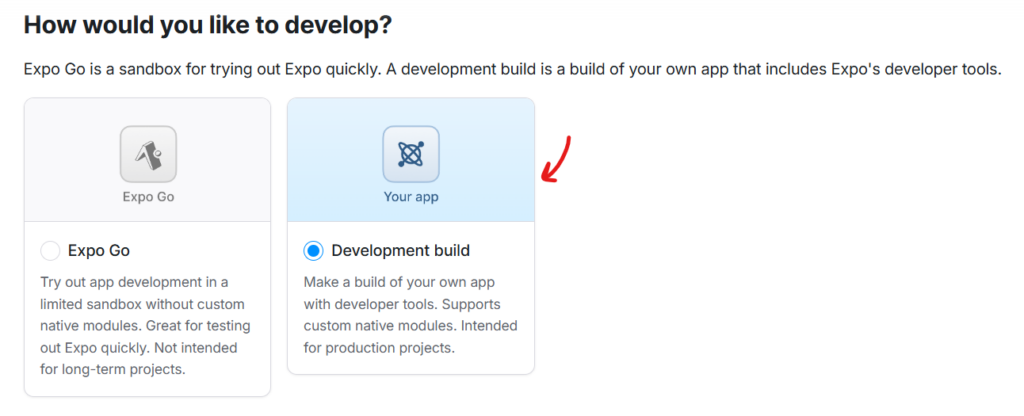
דרך אחרת היא לבנות את הקבצים מקומית. נבנה קובץ apk ונוכל להתקין אותו על המכשיר שלנו ולשלוח אותו גם לאחרים. כדי לראות איך עושים את זה נכנס לקישור ונבחר development build.
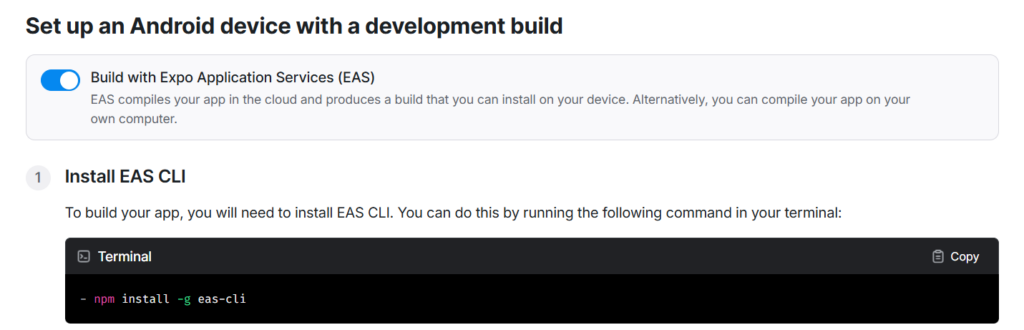
נמשיך להוראות למטה ונתקין את ה-CLI.
אחר כך צריך להרשם ל-Expo אם עוד לא קיים חשבון ולהכנס לחשבון.
אחר כך לכבות את האפשרות של בניית עם EAS (הכפתור הכחול שבתמונה למעלה).

ואחר כך להמשיך לפי ההוראות שיש מתחת לתיבה.
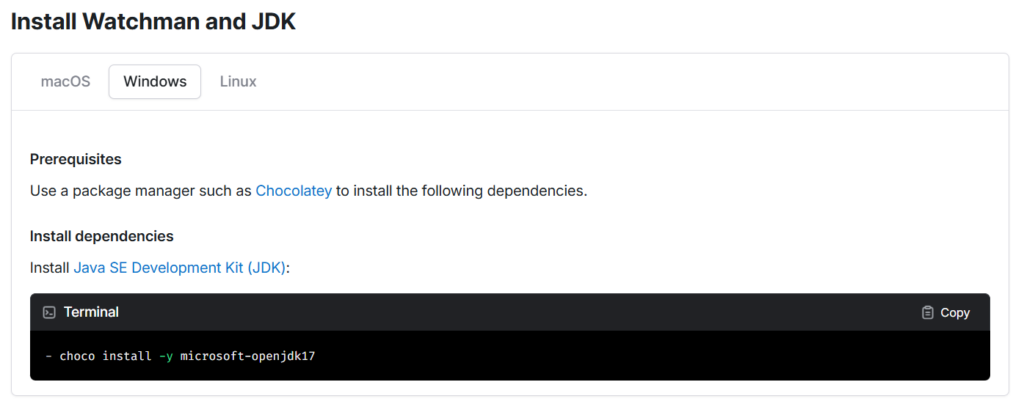
אחר כך ממשיכים בהוראות של התקנת Andriod Studio ובסוף מתקינים את expo-dev-client.
אחרי כל זה בונים את קובץ ה-APK לפי ההוראות בקישור.
לפקודת ה-build להוסיף –local בסוף.
eas build -p android --profile preview --local
לשאלה האם רוצים ליצור פרוייקט אוטומטית נענה כן.
אחר צריך לספק שם לחבילה. הוא צריך להיות ייחודי ולכן כדאי להשתמש למשל בשם דומיין אם יש לכם. למשל:
com.domainname.meditrack
נענה כן לשאלה האם ליצור keystore.
אחרי כל זה נמצא את קובץ ה-APK בתיקיית האב של הפרויקט.
אם רוצים לייצר את קובץ ה-aab אפשר להריץ build של preview2 במקום של preview.
את קובץ ה-APK אפשר לשלוח לאחרים ופשוט להתקין אותו על המכשיר.
כדי להעלות את הקובץ ל-Google Store משלמים חד פעמית סכום של 25$ ואפשר להעלות כמה אפליקציות שרוצים. כדי להעלות ל-appStore צריך לשלם 99$ כל שנה (נכון לכתיבת המאמר כמובן).
אם רוצים לעשות טסטים על האפליקציה, אפשר ללכת לאתר firebase ושם יש אפשרות של App Distribution. לוחצים להתחלה, מעלים את הקובץ ושולחים קישור למי שרוצים.
לשים לב שאם יוצרים קובץ APK חדש, הולכים ל-app.json ומשנים שם את מספר הגרסה.
אם הגעתם עד כאן וקראתם הכל, כל הכבוד. זה היה ארוך, אבל אי אפשר ללמוד קוד בלי ליישם.
כל ההדרכה מבוססת על הוידאו הזה. הסברים מפורטים על כל צעד, החכמתי ממנו. מוזמנים לראות ולפרגן לו.