שלא כמו דף אינטרנט שעובד עם תגיות, אפליקציית react מציגה את רכיבי המסך על ידי קומפוננטות. ל-react יש קומפוננטות מובנות להצגת הדף.
View
הקומפוננטה הכי בסיסית להצגת אלמנטים על המסך. הקומפוננטה משמשת במיכל ומתפקדת בתור div. אפשר לקנן view אחד בתוך השני.
מכיוון שקומפוננטה יכולה להחזיר רכיב אחד, כדי להחזיר כמה רכיבים ביחד, אפשר לעטוף אותם על ידי view.
<View>
  <Text>Hello New React App</Text>
</View>
ל-view אפשר להוסיף styles. המשמעות של flex: 1 היא שהתוכן יקח את כל רוחב המסך.
import { Text, View } from "react-native";

export default function Index() {
  return (
    <View
      style={{
        flex: 1,
        justifyContent: "center",
        alignItems: "center",
      }}
    >
      <Text>Hello New React App</Text>
    </View>
  );
}
Text
קומפוננטת Text מכילה טקסט. אפשר לעצב אותה והיא יכולה להיות לחיצה.
<View>
   <Text style={{ color: "yellow" }}>Hello New React App</Text>
</View>
Image – ImageBackground
קומפוננטת Image מציגה תמונות.
import { Text, View, Image } from "react-native";
const logoImg = require("../assets/images/adaptive-icon.png");

export default function Index() {
  return (
    <View style={{ flex: 1, justifyContent: "center", alignItems: "center" }}>
      <Image source={logoImg} />
    </View>
  );
}
התמונה מופיעה, אבל היא גדולה מידי. נוסיף עיצוב.
<View style={{ flex: 1, justifyContent: "center", alignItems: "center" }}>
   <Image source={logoImg} style={{ width: 300, height: 300 }} />
</View>
הוספת תמונה ממקור אינטרנטי:
<View style={{ flex: 1, justifyContent: "center", alignItems: "center" }}>
   <Image source={{ uri: "https://picsum.photos/300"}} style={{ width: 300, height: 300 }} />
</View>
כשמוסיפים תמונות מקישור, חייב לציין גובה ורוחב.
הוספה תמונה כרקע:
<View style={{ flex: 1, justifyContent: "center", alignItems: "center" }}>
    <ImageBackground source={logoImg}>
        <Text>Text On Background</Text>
    </ImageBackground>
</View>
הרקע יתפוס את גודל המיכל. אם רוצים שהוא יתפוס את כל רקע המסך צריך לציין את זה עם flex.
<View style={{ flex: 1, justifyContent: "center", alignItems: "center" }}>
   <ImageBackground source={logoImg} style={{ flex: 1 }}>
        <Text>Text On Background</Text>
   </ImageBackground>
</View>
Scroll View
אם נסתכל על מבנה הדף הבא, נראה שיש לו תמונה, טקסט ותמונה. התמונה התחתונה לא ניראית כולה כי היא מחוץ למסך ואין לנו אפשרות לגלילה.
<View style={{ flex: 1, justifyContent: "center", alignItems: "center" }}>
      <Image source={logoImg} style={{ width: 300, height: 300 }} />
      <Text style={{ padding: 30 }}>
      Lorem ipsum dolor sit amet consectetur adipisicing elit. Maxime mollitia,
      molestiae quas vel sint commodi repudiandae consequuntur voluptatum laborum
      numquam blanditiis harum quisquam eius sed odit fugiat iusto fuga praesentium
      optio, eaque rerum! Provident similique accusantium nemo autem. Veritatis
      obcaecati tenetur iure eius earum ut molestias architecto voluptate aliquam
      nihil, eveniet aliquid culpa officia aut! Impedit sit sunt quaerat, odit,
      tenetur error, harum nesciunt ipsum debitis quas aliquid. Reprehenderit,
      quia. Quo neque error repudiandae fuga? Ipsa laudantium molestias eos
      sapiente officiis modi at sunt excepturi expedita sint? Sed quibusdam
      recusandae alias error harum maxime adipisci amet laborum. Perspiciatis
      minima nesciunt dolorem! Officiis iure rerum voluptates a cumque velit
      quibusdam sed amet tempora. Sit laborum ab, eius fugit doloribus tenetur
      fugiat, temporibus enim commodi iusto libero magni deleniti quod quam
      consequuntur! Commodi minima excepturi repudiandae velit hic maxime
      doloremque. Quaerat provident commodi consectetur veniam similique ad
      earum omnis ipsum saepe, voluptas, hic voluptates pariatur est explicabo
      fugiat, dolorum eligendi quam cupiditate excepturi mollitia maiores labore
      suscipit quas? Nulla, placeat. Voluptatem quaerat non architecto ab laudantium
      modi minima sunt esse temporibus sint culpa, recusandae aliquam numquam
      totam ratione voluptas quod exercitationem fuga. Possimus quis earum veniam
      quasi aliquam eligendi, placeat qui corporis!
      </Text>
      <Image source={logoImg} style={{ width: 300, height: 300 }} />
    </View>
הגלילה היא לא אוטומטית. כדי לאפשר גלילה צריך להשתמש בקומפוננטת ScrollView. את ה-ScrollView נכניס לתוך ה-View כדי שיהיו לו הגדרות עמוד כמו שצריך.
<View style={{ flex: 1, justifyContent: "center", alignItems: "center" }}>
  <ScrollView>
    <Image source={logoImg} style={{ width: 300, height: 300 }} />
    <Text style={{ padding: 30 }}>
    Lorem ipsum dolor sit amet consectetur adipisicing elit. Maxime mollitia,
    ...
    </Text>
    <Image source={logoImg} style={{ width: 300, height: 300 }} />
  </ScrollView>
</View>
Button
כפתור מאפשר להטריג פעולות. את הטקסט שעל הכפתור שולחים על ידי title. ערך נוסף שאפשר להשתמש בו הוא disabled.
<View style={{ flex: 1, justifyContent: "center", alignItems: "center" }}>
   <Button title="Press" onPress={() => console.log("Botton pressed")} color="blue" />
</View>
Pressable
אפשר להטריג אירועים גם בלחיצה על טקסט ותמונות.
<View style={{ flex: 1, justifyContent: "center", alignItems: "center", padding: 50 }}>
      <Button title="Press" onPress={() => console.log("Botton pressed")} color="blue" />

      <Pressable onPress={() => console.log("Image pressed")}>
        <Image source={logoImg} style={{ width: 300, height: 300 }} />
      </Pressable>

      <Pressable onPress={() => console.log("Text pressed")}>
        <Text style={{ color: "red" }}>Hello New React App</Text>
      </Pressable>
</View>
ל-pressable יש אפשרויות לטריגרים נוספים של onPressIn, onPressOut, onLongPress.
Modal
חלונות קופצים.
useState משמש לבדיקה האם החלון צריך להיות פתוח או סגור. כשלוחצים על הכפתור, קוראים ל-setIsModalVisible שהופך את הנראות ל-true.
כשלוחיצים על הכפתור בתוך החלון, יש קריאה ל-setIsModalVisible שהופכת את הניראות ל-false.
השימוש ב-onRequestClose הוא כדי לטפל במקרה שלחצים על כפתור "חזור" בטלפון.
import { useState } from "react";
import { Text, View, Button, Modal } from "react-native";

export default function Index() {
  const [isModalVisible, setIsModalVisible] = useState(false);

  return (
    <View style={{ flex: 1, justifyContent: "center", alignItems: "center", padding: 50 }}>
      <Button title="Press" onPress={() => setIsModalVisible(true)} color="blue" />

      <Modal
        visible={isModalVisible}
        onRequestClose={() => setIsModalVisible(false)}>

        <View style={{ flex: 1, backgroundColor: "lightblue", padding: 50 }}>
          <Text>Modal Text</Text>
          <Button title="Close" onPress={() => setIsModalVisible(false)} color="midnightblue" />
        </View>

      </Modal>
    </View>
  );
}
תכונה שאפשר להשתמש בה היא animationType. אם נשלח את הערך slide נקבל אפקט של כניסה למסך.
Status Bar
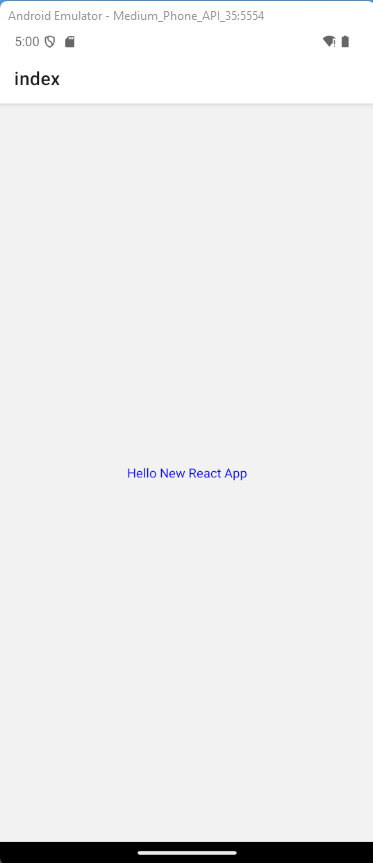
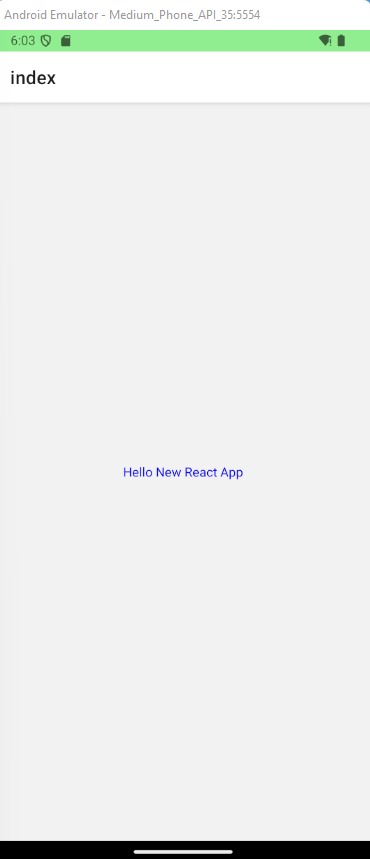
מאפשר שליטה בחלק העליון של המסך, איפה שמוצגת השעה והסוללה. אם לא רוצים שיראו את שורת הסטטוס אפשר להוסיף hidden לתגית ה-StatusBar. בתמונה הראשונה יש את השורה העליונה ללא התייחסות של הקוד ובתמונה השנייה אחרי שהוספנו את StatusBar לקוד.


import { View, StatusBar, Text } from "react-native";

export default function Index() {
  return (
    <View style={{ flex: 1, justifyContent: "center", alignItems: "center", padding: 50 }}>
      <Text style={{ color: "blue" }}>Hello New React App</Text>
      <StatusBar backgroundColor="lightgreen" barStyle="dark-content"/>
    </View>
  );
}
Activity Indicator
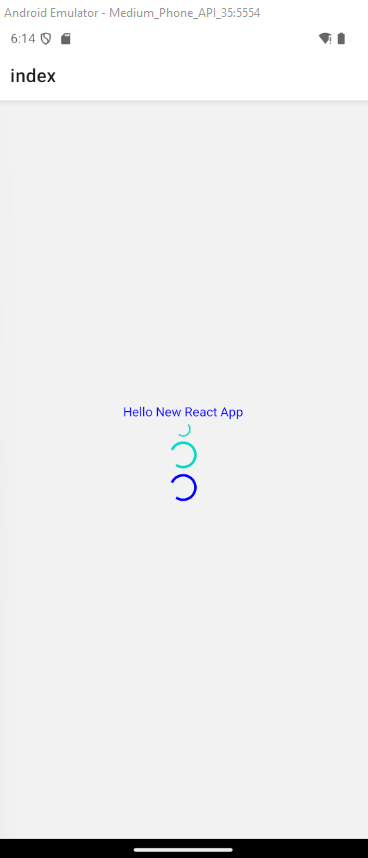
חיווי כשיש תוכן שנטען על מנת לתת למשתמש הבנה מה קורה. התכונה animating אומרת האם הסמן עובד או לא ועדיף להשתמש בו עם state ולא ישירות.

import { View, ActivityIndicator, Text } from "react-native";

export default function Index() {
  return (
    <View style={{ flex: 1, justifyContent: "center", alignItems: "center", padding: 50 }}>
      <Text style={{ color: "blue" }}>Hello New React App</Text>
      <ActivityIndicator />
      <ActivityIndicator size="large"/>
      <ActivityIndicator size="large" color="blue"/>
      <ActivityIndicator size="large" color="yellow" animating={ false }/>
    </View>
  );
}
Alert
משתמשים ב-Alert כדי להקפיץ חלון עם כותרת והודעה.
הכפתור הראשון מעלה הודעה פשוטה, השני מעלה הודעה עם הודעת משנה, והשלישי משנה את הכפתורים של החלון להיות מותאמים.
import { View, Alert, Button } from "react-native";

export default function Index() {
  return (
    <View style={{ flex: 1, justifyContent: "center", alignItems: "center", padding: 50 }}>
      <Button title="Alert" onPress={() => Alert.alert("Invalid Data!")} />
      <Button title="Alert 2" onPress={() => Alert.alert("Invalid Data!", "No connection")} />
      <Button title="Alert 3" onPress={() => Alert.alert("Invalid Data!", "No connection", [
        {
          text: 'Cancel',
          onPress: () => console.log("Cancel pressed")
        },
        {
          text: 'OK',
          onPress: () => console.log("OK pressed")
        }
      ])} />
    </View>
  );
}
Custom Components
עד עכשיו ראינו קומפוננטות מובנות של react native. אפשר לבנות קומפוננטות לבד. כדאי לרכז אותן בתיקייה בשם components.
ניצור קובץ בשם: Greet.js.
import { View, Text } from 'react-native'

export default function Greet({ name }){
    return(
        <View>
            <Text>Hello, {name}</Text>
        </View>
    )
}
נחזור לקובץ הראשי ונקרא לקומפוננטה שיצרנו.
import { View } from "react-native";
import Greet from '../components/Greet'

export default function Index() {
  return (
    <View style={{ flex: 1, justifyContent: "center", alignItems: "center", padding: 50 }}>
      <Greet name='Danny' />
    </View>
  );
}
נראה את תוכן הקומפוננטה מופיע עם השם ששלחנו.
