כדי לאסוף את כל מה שהיה עד כה, נבנה פרויקט לדוגמא. בפרוייקט נבנה כרטיסים מעוצבים שמכילים מתכונים.
הקמת פרויקט ריק
נתחיל עם קוד בסיסי על המסך:
import { View, StyleSheet, SafeAreaView } from "react-native";

export default function Index() {
  return (
    <SafeAreaView style={styles.safeContainer}>

    </SafeAreaView>
  );
}

const styles = StyleSheet.create({
  safeContainer: {
    flex: 1,
    backgroundColor: "#f5f5f5",
    paddingTop: 25
  }
})
השלב הבא הוא לשים את תמונות המתכונים בתיקיית assets על מנת להשתמש בהן בהמשך.
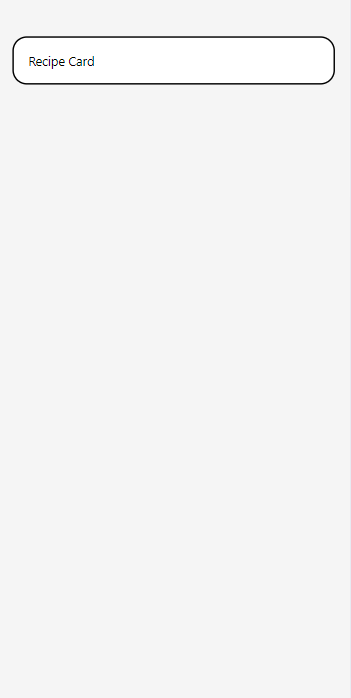
בתוך תיקיית components ניצור קובץ חדש בשם: RecipeCard.js. נכניס קוד בסיסי לקומפוננטה:
import { View, Text } from "react-native";

export default function RecipeCard(){
    return(
        <View>
            <Text>Recipe Card</Text>
        </View>
    )
}
נייבא ונציג אותה בקובץ הראשי.
עיצוב הכרטיס
נכין את העיצוב הבסיסי של הכרטיס עם רקע ומסגרת. את הצל נחולל לפי מערכת הפעלה.
import { View, Text, StyleSheet, Platform } from "react-native";

export default function RecipeCard(){
    return(
        <View style={styles.card}>
            <Text>Recipe Card</Text>
        </View>
    )
}

const styles = StyleSheet.create({
    card: {
        backgroundColor: "white",
        borderRadius: 16,
        borderWidth: 2,
        padding: 16,
        margin: 16,
        ...Platform.select({
            ios: {
              shadowOffset: { width: 2, height: 2 },
              shadowColor: "#333",
              shadowOpacity: 0.3,
              shadowRadius: 4,
            },
            android: {
              elevation: 5,
            },
        }),
    }
  })
ככה זה נראה בשלב הזה:
הכנסת התוכן
אובייקט התוכן
נתחיל מבניית האובייקט שאליו יוכנסו פרטי המתכון. על מנת לשמור על הסדר יצרתי תיקיית models ובתוכה את interface המתכון בקובץ RecipeCard.ts.
export default interface RecipeCardDisplay {
    name: string;
    image: string;
    ingredients: string[];
    instructions: string[];
    prepTime: string;
    coockingTime: string;
    servings: number;
    calories: number;
}
שליחת המידע לקומפוננטה
בקובץ הראשי הגדרתי את האובייקט של המתכון הראשון. את המידע הזה נשלח לקומפוננטת הכרטיס.
export default function Index() {
  const chocolateChipCookies: RecipeCardDisplay = {
    name: "Almond Flour Chocolate Chip Cookies",
    image: "./assets/images/Almond_Flour_Chocolate_Chip.png",
    ingredients: [
      "2 cups almond flour (or replace with oat flour or coconut flour, adjust to 1.5 cups for oat, 1 cup for coconut)",
      "1/2 tsp baking powder",
      "1/4 tsp salt",
      "1/3 cup coconut oil, melted",
      "1/2 cup coconut sugar",
      "1 large egg",
      "1 tsp vanilla extract",
      "1/2 cup dark chocolate chips"
      ],
    instructions: [
      "Preheat oven to 350°F (175°C). Line a baking sheet with parchment paper.",
      "In a bowl, mix almond flour, baking powder, and salt.",
      "In another bowl, whisk coconut oil, coconut sugar, egg, and vanilla.",
      "Combine wet and dry ingredients and stir until a dough forms.",
      "Fold in chocolate chips.",
      "Scoop dough onto the prepared baking sheet.",
      "Bake for 10-12 minutes, or until edges are golden brown.",
      "Cool completely before serving."
    ],
    prepTime: "10 Min",
    coockingTime: "12 Min",
    servings: 9,
    calories: 281
  }

  return (
    <SafeAreaView style={styles.safeContainer}>
        <RecipeCard {...chocolateChipCookies}/>
    </SafeAreaView>
  );
}
הצגת המידע בקומפוננטה
את המידע ששלחנו לקומפוננטה, נקבל ונשתמש בחלקים של האובייקט. כרגע נציב את התוכן בצורה פשוטה.
export default function RecipeCard( {recipeContent} ){
    return(
        <View style={styles.card}>
            <Image source={recipeContent.image}></Image>

            <View>
                <Text>{recipeContent.name}</Text>
            </View>

            <View>
                <Text>{recipeContent.prepTime}</Text>
                <Text>{recipeContent.coockingTime}</Text>
                <Text>{recipeContent.servings}</Text>
            </View>

            <View>
                <Text>{recipeContent.calories}</Text>
            </View>

            <View>
                <Text>{recipeContent.ingredients}</Text>
                <Text>{recipeContent.instructions}</Text>
            </View>
        </View>
    )
}
התוכן עכשיו לא מעוצב, אבל מופיע בקומפוננטה.
מכיוון שאני רוצה להציג את המרכיבים וההוראות כל אחד בשורה נפרדת, שיניתי קצת את התצוגה שלהם וכתבתי אותם כך:
<View>
    {recipeContent.ingredients.map((ingredient) => {
        return (
        <View>
            <Text>{ingredient}</Text>
        </View>
        );
    })}
</View>

<View>
    {recipeContent.instructions.map((instruction) => {
        return (
        <View>
            <Text>{instruction}</Text>
        </View>
        );
    })}
</View>
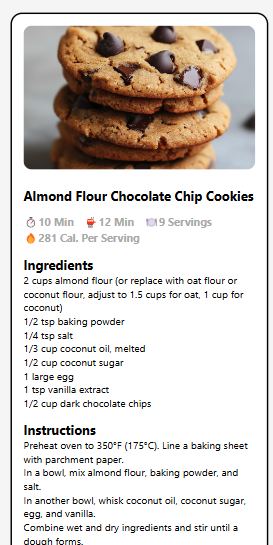
עיצוב הכרטיס
אחרי שיש לנו את כל המרכיבים נעצב כל חלק בנפרד. השתמשתי באימוג'ים, פשוט חיפשתי באינטרנט דף של אימוג'ים והעתקתי אותם לקובץ.
import { View, Text, StyleSheet, Platform, Image } from "react-native";

export default function RecipeCard( {recipeContent} ){
    return(
        <View style={styles.card}>
            <Image source={recipeContent.image} style={styles.image}></Image>

            <View style={styles.nameContainer}>
                <Text style={styles.recipeName}>{recipeContent.name}</Text>
            </View>

            <View style={styles.infoContainer}>
                <Text style={styles.infoText}>⏱️{recipeContent.prepTime}</Text>
                <Text style={styles.infoText}>🫕{recipeContent.coockingTime}</Text>
                <Text style={styles.infoText}>🍽️{recipeContent.servings} Servings</Text>
            </View>

            <View style={styles.caloriesContainer}>
                <Text style={styles.infoText}>🔥{recipeContent.calories} Cal. Per Serving</Text>
            </View>

            <View style={styles.ingredientsContainer}>
                <Text style={styles.innerHeadline}>Ingredients</Text>
                {recipeContent.ingredients.map((ingredient) => {
                    return (
                    <View style={styles.ingredientText}>
                        <Text>{ingredient}</Text>
                    </View>
                    );
                })}
            </View>

            <View style={styles.instructionsContainer}>
                <Text style={styles.innerHeadline}>Instructions</Text>
                {recipeContent.instructions.map((instruction) => {
                    return (
                    <View style={styles.instructionText}>
                        <Text>{instruction}</Text>
                    </View>
                    );
                })}
            </View>
        </View>
    )
}

const styles = StyleSheet.create({
    card: {
        backgroundColor: "white",
        borderRadius: 16,
        borderWidth: 2,
        padding: 16,
        margin: 16,
        ...Platform.select({
            ios: {
              shadowOffset: { width: 2, height: 2 },
              shadowColor: "#333",
              shadowOpacity: 0.3,
              shadowRadius: 4,
            },
            android: {
              elevation: 5,
            },
        }),
    },

    image: {
        width: "100%", // Adjust width to fit the card
        height: 200, // Adjust height as needed
        borderRadius: 12,
        marginBottom: 16,
    },

    recipeName: {
        fontSize: 18,
        fontWeight: "bold",
        marginTop: 8,
    },

    infoContainer: {
        flex: 1,
        flexDirection: "row",
        justifyContent: "flex-start",
        paddingTop: 15,
        marginBottom: 2
    },

    infoText: {
        textAlign: "center",
        fontSize: 15,
        fontWeight: "bold",
        color: "#aaa",
        marginRight: 14
    },

    innerHeadline:{
        fontWeight: "bold",
        fontSize: 18
    },

    ingredientsContainer: {
        marginBottom: 15
    },

    instructionsContainer: {
        marginBottom: 15
    },

    caloriesContainer: {
        flex: 1,
        flexDirection: "row",
        justifyContent: "flex-start",
        marginBottom: 15
    }
  })
ככה המסך נראה:
הכנסת שאר הכרטיסים
מה שנשאר זה להכניס את שאר כרטיסי המתכונים. נגדיר את המשתנים שמחזיקים את שאר המתכונים ונוסיף אותם לאפליקציה.
נראה שאי אפשר לגלול ולראות את שאר המתכונים שהוספנו. כברירת מחדל המסך לא ניתן לגלילה.
כדי לאפשר את זה נוסיף ScrollView.
import { StyleSheet, SafeAreaView, ScrollView } from "react-native";
import RecipeCard from "../components/RecipeCard"
import {RecipeContent} from "../models/RecipeCard"

export default function Index() {
  const chocolateChipCookies: RecipeContent = {
    name: "Almond Flour Chocolate Chip Cookies",
    image: require("../assets/images/Almond_Flour_Chocolate_Chip.png"),
    ingredients: [
      "2 cups almond flour (or replace with oat flour or coconut flour, adjust to 1.5 cups for oat, 1 cup for coconut)",
      "1/2 tsp baking powder",
      "1/4 tsp salt",
      "1/3 cup coconut oil, melted",
      "1/2 cup coconut sugar",
      "1 large egg",
      "1 tsp vanilla extract",
      "1/2 cup dark chocolate chips"
      ],
    instructions: [
      "Preheat oven to 350°F (175°C). Line a baking sheet with parchment paper.",
      "In a bowl, mix almond flour, baking powder, and salt.",
      "In another bowl, whisk coconut oil, coconut sugar, egg, and vanilla.",
      "Combine wet and dry ingredients and stir until a dough forms.",
      "Fold in chocolate chips.",
      "Scoop dough onto the prepared baking sheet.",
      "Bake for 10-12 minutes, or until edges are golden brown.",
      "Cool completely before serving."
    ],
    prepTime: "10 Min",
    coockingTime: "12 Min",
    servings: 9,
    calories: 281
  }

  const glutenFreeBlueberryMuffins: RecipeContent = {
    name: "Gluten-Free Blueberry Muffins",
    image: require("../assets/images/GlutenFree_Blueberry_Muffins.png"),
    ingredients: [
      "1 1/2 cups gluten-free all-purpose flour",
      "1 tsp baking powder",
      "1/2 tsp baking soda",
      "1/4 tsp salt",
      "1/2 cup granulated sugar",
      "1/4 cup coconut oil, melted",
      "1/2 cup almond milk",
      "1 large egg",
      "1 tsp vanilla extract",
      "1 cup fresh blueberries"
      ],
    instructions: [
      "Preheat oven to 375°F (190°C). Line a muffin tin with paper liners.",
      "In a bowl, mix gluten-free flour, baking powder, baking soda, and salt.",
      "In another bowl, whisk sugar, coconut oil, almond milk, egg, and vanilla extract.",
      "Gradually add the dry ingredients to the wet mixture and stir until smooth.",
      "Fold in the blueberries gently.",
      "Divide the batter evenly among the muffin cups.",
      "Bake for 18-20 minutes, or until a toothpick comes out clean.",
      "Cool in the tin for 5 minutes before transferring to a wire rack."
    ],
    prepTime: "10 Min",
    coockingTime: "18 Min",
    servings: 12,
    calories: 146
  }

  return (
    <SafeAreaView style={styles.safeContainer}>
      <ScrollView>
        <RecipeCard recipeContent={chocolateChipCookies}/>
        <RecipeCard recipeContent={glutenFreeBlueberryMuffins}/>
      </ScrollView>
    </SafeAreaView>
  );
}

const styles = StyleSheet.create({
  safeContainer: {
    flex: 1,
    backgroundColor: "#f5f5f5",
    paddingTop: 25
  }
})