The Decorator Design Pattern מאפשר לנו להוסיף פונקציונליות לאובייקטים קיימים בזמן ריצה מבלי לשנות את המבנה של האובייקט המקורי. אנחנו יוצרים class שהוא decorator והוא עוטף את ה-class המקורי ומוסיף את הפונקציונליות. בדרך כלל decorator class יהיה בעל אחריות על פעולה אחת בלבד.
מה זה Decorator Design Pattern?
נניח שאני בבית קפה. אני מזמינה קפה בסיסי, אבל לקפה הזה אני יכולה גם להזמין תוספות כמו חלב, סוכר ואבקת קקאו, בתשלום נפרד.
- הקפה הבסיסי (Component) – זה האובייקט המקורי.
- תוספות (Decorators) – כל תוספת היא decorator, שמוסיפה משהו למוצר המקורי.
דוגמא – בית קפה
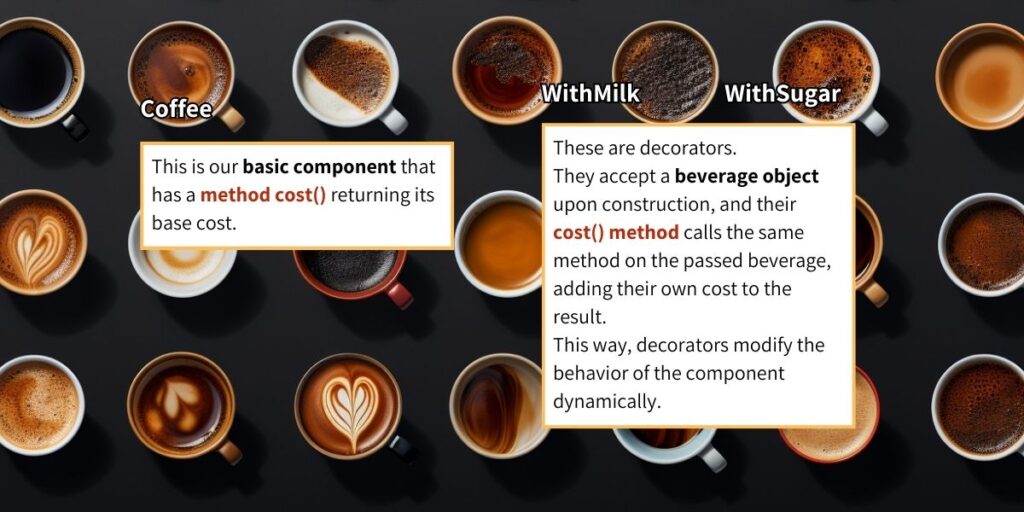
Components
Coffee – קומפוננטת הבסיס, אפשר לשים עליה Decorators של מוצרים שונים.
Decorators
WithMilk – הוספת decorator של חלב.
WithSugar – הוספת decorator של סוכר.
הקוד ב-javascript.
קובץ Coffee Class (Component)
class Coffee {
    cost() {
        return 5; // Basic cost of a coffee is 5 units
    }
}
קובץ Milk Decorator
class WithMilk {
    constructor(beverage) {
        this.beverage = beverage;
    }

    cost() {
        return this.beverage.cost() + 2; // Adding cost of milk: 2 units
    }
}
קובץ Sugar Decorator
class WithSugar {
    constructor(beverage) {
        this.beverage = beverage;
    }

    cost() {
        return this.beverage.cost() + 1; // Adding cost of sugar: 1 unit
    }
}
קובץ שימוש בדוגמא
let myCoffee = new Coffee();

// Decorating with milk
myCoffee = new WithMilk(myCoffee);

// Decorating with sugar
myCoffee = new WithSugar(myCoffee);

console.log(`Total cost: ${myCoffee.cost()}`); // Output: Total cost: 8
אנחנו יוצרים את אובייקט הבסיס, Coffee ועליו מוסיפים את ה-Decorators של WithMilk, WithSugar שמוסיפים את הפונקציונליות שלהם לאובייקט הבסיס. האובייקט של Coffee שיצרנו לא משתנה. כמו כן אנחנו יכולים להוסיף עוד כמה Decorators שנרצה בשרשרת.
נקודות מפתח לשימוש ב-Decorator Design Pattern
- שיפור אובייקטים דינמי – אפשר להוסיף פונקציונליות לאובייקטים בלי לעשות שינוי בקוד של ה-class המקורי.
- שימוש ב-interface זהה – ל-Decorators יש את אותו ה-interface של האובייקט שעליו הם עובדים.
- אחריות בודדת – לכל decorator תהיה אחריות על פעולה אחת לביצוע, אם יש פעולה נוספת היא תתבצע על ידי ה-class המקורי או על ידי decorator נוסף.
- שרשרת של Decorators – אפשר לעשות שרשרת של Decorators כדי ליצור קומבינציות שונות של פעולות.
דוגמא נוספת – Admin Panel
נניח שיש לנו אפליקציה עם רמות ניהול שונות למשתמשים, למשל יש לנו מנהל (Admin), עורך (Editor) וצופה (Viewer). לכל תפקיד יש יכולות שונות בנוגע לפעולות שהוא יכול לבצע באפליקציה. אנחנו רוצים להוסיף על ידי decorator פעולות על פעולות הבסיס. הקוד אנגולרי.
Components and Decorators
UserService – מנהל את המידע הבסיסי של המשתמש.
AdminUserDecorator – מוסיף יכולות ניהול למשתמש.
EditorUserDecorator – מוסיף יכולות עריכה למשתמש.

Example Angular Implementation
קובץ UserService (Component)
import { Injectable } from '@angular/core';

@Injectable({
  providedIn: 'root'
})
export class UserService {
  getUser() {
    // Logic to get basic user data...
    return { name: 'John Doe', role: 'Editor' };
  }
}
קובץ AdminUserDecorator
function AdminUserDecorator(userService: UserService) {
  const oldGetUser = userService.getUser;

  userService.getUser = function(): any {
    const user = oldGetUser.call(userService);
    user.canEdit = true;
    user.canDelete = true;
    user.canAdd = true;
    return user;
  };

  return userService;
}
קובץ EditorUserDecorator
function EditorUserDecorator(userService: UserService) {
  const oldGetUser = userService.getUser;

  userService.getUser = function(): any {
    const user = oldGetUser.call(userService);
    user.canEdit = true;
    user.canDelete = false;
    user.canAdd = true;
    return user;
  };

  return userService;
}
קובץ AppComponent (Usage)
import { Component, OnInit } from '@angular/core';
import { UserService } from './user.service';

@Component({
  selector: 'app-root',
  template: `
    <h1>Welcome, {{ user.name }}</h1>
    <p *ngIf="user.canEdit">You have edit permissions.</p>
    <p *ngIf="user.canDelete">You have delete permissions.</p>
    <p *ngIf="user.canAdd">You have add permissions.</p>
  `
})
export class AppComponent implements OnInit {
  user: any;

  constructor(private userService: UserService) {}

  ngOnInit(): void {
    this.user = this.userService.getUser();
    if (this.user.role === 'Admin') {
      AdminUserDecorator(this.userService);
    } else if (this.user.role === 'Editor') {
      EditorUserDecorator(this.userService);
    }
    // Re-fetch user to get the decorated abilities.
    this.user = this.userService.getUser();
  }
}
דוגמא – תוכנית מנויים
באתר מכירות יש מספר סוגים של מןכרים לפי סוג מנוי. לכל מנוי האתר מציג דברים אחרים. למשל, למנוי בסיסי יש תצוגה בסיסית ולמנוי פרימיום יש תוספת של תמונות, נקודות קרדיט לפרסום וכו'. נשתמש ב-decorator pattern על מנת להציג את האפשריות הנוספות.
Components and Decorators
SellerService – ניהול המנוי הבסיסי, זה הבסיס לכל המנויים.
PremiumSellerDecorator – ה-decorator שמוסיף את תכונות תוכנית ה-premium.
EliteSellerDecorator – ה-decorator שמוסיף עוד אפשרויות של תוכנית elite.
SellerService (Component)
import { Injectable } from '@angular/core';

@Injectable({
  providedIn: 'root'
})
export class SellerService {
  getSeller() {
    return { name: 'TechStore', subscription: 'Elite' };
  }
}
PremiumSellerDecorator
function PremiumSellerDecorator(sellerService: SellerService) {
  const oldGetSeller = sellerService.getSeller;

  sellerService.getSeller = function(): any {
    const seller = oldGetSeller.call(sellerService);
    seller.featuredListing = true;
    seller.adCredits = 50;
    return seller;
  };

  return sellerService;
}
EliteSellerDecorator
function EliteSellerDecorator(sellerService: SellerService) {
  const oldGetSeller = sellerService.getSeller;

  sellerService.getSeller = function(): any {
    const seller = oldGetSeller.call(sellerService);
    seller.advancedAnalytics = true;
    seller.prioritySupport = true;
    return seller;
  };

  return sellerService;
}
StoreComponent (Usage)
<h1>Welcome to {{ seller.name }}'s Store</h1>
<p *ngIf="seller.featuredListing">- Featured Product Listings Enabled</p>
<p *ngIf="seller.adCredits">- Advertisement Credits: {{ seller.adCredits }}</p>
<p *ngIf="seller.advancedAnalytics">- Advanced Analytics Enabled</p>
<p *ngIf="seller.prioritySupport">- Priority Support Enabled</p>
import { Component, OnInit } from '@angular/core';
import { SellerService } from './seller.service';
@Component({
selector: 'app-store',
template: ` `
})
export class StoreComponent implements OnInit {
seller: any;
constructor(private sellerService: SellerService) {}
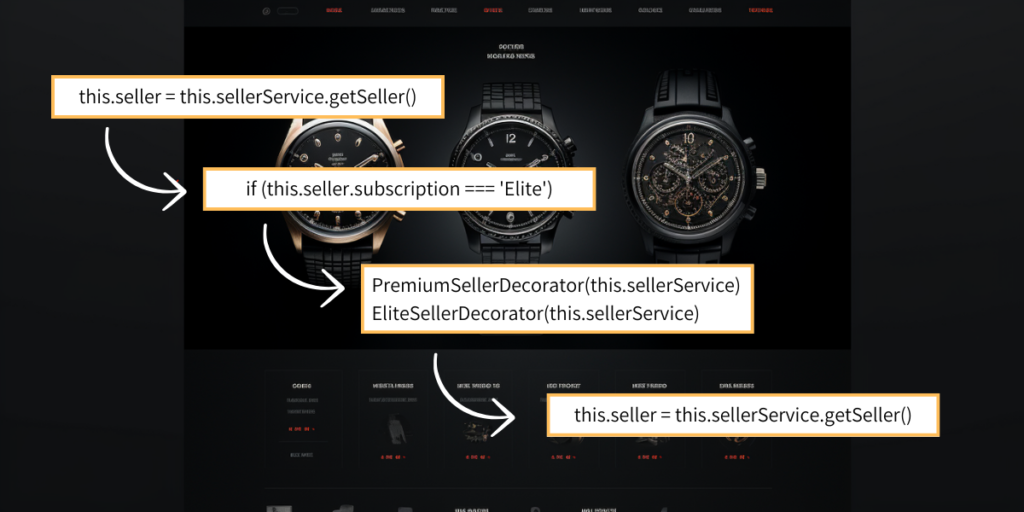
ngOnInit(): void {
this.seller = this.sellerService.getSeller();
if (this.seller.subscription === 'Premium') {
PremiumSellerDecorator(this.sellerService);
} else if (this.seller.subscription === 'Elite') {
PremiumSellerDecorator(this.sellerService);
EliteSellerDecorator(this.sellerService);
}
this.seller = this.sellerService.getSeller();
}
}
כשמוכר מוגדר כ-Elite, הוא מקבל את כל האפשרויות של PremiumSellerDecorator ועל גבי זה את האפשרויות של EliteSellerDecorator. על זה אפשר להוסיף כמה אפשרויות שרוצים וזה מבלי לגעת ב-class הבסיס.
בעיה ופתרון – עיצוב טקסט
נניח שיש לנו אפליקציה שבה יש טקסט בעיצוב שונה, למשל טקסט רגיל, בולט, נטוי וכו'. גישה אחת לפתרון של העיצוב היא ליצור class שונה לכל עיצוב. יהיה לנו class לעיצוב bold ואחד ל-italic. אבל מה אם נרצה טקסט שהוא גם וגם? ניצר class של bold-italic ומה אם יש לנו עוד 10 אפשרויות עיצוב? ואנחנו רוצים לאפשר צרופים שלהם? תהיה לנו התפוצצות classes שתהיה בלתי אפשרית לניהול.
שלבי הבעיה
- אנחנו רוצים מספר אפשרויות עיצוב: bold, italic, underline, strike-through.
- לטקסט יכולות להיות קומבינציות של הדגשות.
- יצירת class לכל אפשרות היא לא מעשית.
הפתרון – שימוש ב-Decorator Pattern
ה-Decorator Pattern מאפשר לנו להוסיף דינמית בזמן ריצה את האפשרויות שאנחנו רוצים בלי ליצור class לכל הקומבינציות. נראה קוד ב-javascript.
TextComponent (Component)
class TextComponent {
    constructor(text) {
        this.text = text;
    }

    getStyledText() {
        return this.text;
    }
}
TextDecorators
class BoldDecorator {
    constructor(textComponent) {
        this.textComponent = textComponent;
    }

    getStyledText() {
        return `<b>${this.textComponent.getStyledText()}</b>`;
    }
}

class ItalicDecorator {
    constructor(textComponent) {
        this.textComponent = textComponent;
    }

    getStyledText() {
        return `<i>${this.textComponent.getStyledText()}</i>`;
    }
}

class UnderlineDecorator {
    constructor(textComponent) {
        this.textComponent = textComponent;
    }

    getStyledText() {
        return `<u>${this.textComponent.getStyledText()}</u>`;
    }
}

class StrikeThroughDecorator {
    constructor(textComponent) {
        this.textComponent = textComponent;
    }

    getStyledText() {
        return `<strike>${this.textComponent.getStyledText()}</strike>`;
    }
}
Usage Example
let myText = new TextComponent('Hello, World!');

// Adding bold and italic formatting to the text
myText = new BoldDecorator(myText);
myText = new ItalicDecorator(myText);

console.log(myText.getStyledText()); // Output: <i><b>Hello, World!</b></i>
בעיה ופתרון – תוספות למוצרים
נניח שאנחנו מפתחים חנות אינטרנטית שמוכרת מוצרים. למוצרים יכולים להיות תוספות שונות כמו: אריזת מתנה, משלוח מהיר, כרטיס ברכה ואחריות מוגדלת. האתגר הוא לאפשר את התוספות האלה בלי לשנות את אובייקט המוצר הבסיסי.
מה יש לנו?
- מוצר בסיסי עם תאור ומחיר.
- אפשרויות שונות לתוספות, כמו אריזת מתנה, משלוח מהיר וכו'
- אפשר ליצור קומבינציות של התוספות, כלומר לבחור אריזת מתנה וגם משלוח מהיר.
- צריך לשמור על אובייקט מוצר הבסיס ללא שינוי.
- לא להגיע להתפוצצות אובייקטים מכמות הצרופים האפשריים.
פתרונות אפשריים
ירושה -Inheritance (Subclassing)
- דרך הפתרון – יצירת אובייקטים שיורשים מאובייקט הבסיס ולכל אובייקט יש את התוספת שאנחנו רוצים.
- חסרון – מוביל להתפוצצות (אוכלוסין) של אובייקטים מכיוון שלכל צירוף תוספות צריך ליצור אובייקט חדש.
- Decorator Pattern – מונע את המצב הזה, מכיוון שלכל אפשרות יש אובייקט אחד בלבד ועליו מלבישים דינמית את התוספת.
הרכבה – Composition
- דרך הפתרון – נחזיק אובייקט שיש לו מערך של כל התוספות ונעבור עליהן בכל פעם כדי לראות לאיזה תוספת יש true כדי לחשב את המחיר.
- חסרון – כל הוספה או הסרה של תוספת דורשת מאיתנו לשנות את המערך, מה שיגרום לשגיאה במקומות שמשתמשים בהם באובייקט.
- Decorator Pattern – מאפשר שירשור של תוספות בלי לשנות את האובייקט הראשי.
שימוש ב- Multiple Properties/Flags in a Single Class
- דרך הפתרון – שימוש בתכונות בתוך האובייקט כמו hasGiftWrap, hasExpressShipping.
- חסרון – צריך לעדכן את האובייקט עצמו בכל פעם כשיש לנו תוספת חדשה. האובייקט עצמו הופך להיות מאוד מורכב.
- Decorator Pattern – הוספת תוספות ללא שינוי האובייקט הראשי. קל לנהל כל תוספת כי היא עומדת בפני עצמה.
שימוש ב-Strategy Pattern
- דרך הפתרון – להגדיר משפחה של אלגוריתמים (לכל תוספת) שאפשר להחליף ביניהם. את המחיר הסופי יקבע אובייקט האסטרטגיה שנבחרה.
- חסרון – צריך לנהל את האסטרטגיות דינמית, וניהול אסטרטגיות מרובות יכול להיות מורכב.
- Decorator Pattern – אפשר לקרוא לכל תוספת, על התוספת הקודמת, לשרשר אותן, כך שלא צריך לנהל כל אחת בנפרד.
הפתרון למעלה כולם אפשריים, ובכל מצב צריך להשתמש בפתרון הכי מתאים כמובן. כאן נראה פתרון עם Decorator Pattern.
הפתרון אנגולרי.
Basic Product Class
class Product {
    constructor(public description: string, public price: number) {}

    getDescription(): string {
        return this.description;
    }

    getPrice(): number {
        return this.price;
    }
}
Abstract Decorator and Concrete Decorators
abstract class ProductDecorator extends Product {
    constructor(protected product: Product) {
        super(product.description, product.price);
    }
}

class GiftWrapDecorator extends ProductDecorator {
    getDescription(): string {
        return `${this.product.getDescription()} + Gift Wrap`;
    }

    getPrice(): number {
        return this.product.getPrice() + 5;
    }
}

class ExpressShippingDecorator extends ProductDecorator {
    getDescription(): string {
        return `${this.product.getDescription()} + Express Shipping`;
    }

    getPrice(): number {
        return this.product.getPrice() + 20;
    }
}
Usage Example in Angular Component
import { Component } from '@angular/core';

@Component({
    selector: 'app-root',
    template: `
        <h1>{{ productDescription }}</h1>
        <p>{{ productPrice }}</p>
    `
})
export class AppComponent {
    product: Product;
    productDescription: string;
    productPrice: number;

    constructor() {
        this.product = new Product('Watch', 100);

        // Applying decorators dynamically
        this.product = new GiftWrapDecorator(this.product);
        this.product = new ExpressShippingDecorator(this.product);

        this.productDescription = this.product.getDescription();
        this.productPrice = this.product.getPrice();
    }
}
